 QA
QA
XCUITest Form Testing is essential for validating iOS forms where users enter text, select values, interact with keyboards, and submit structured data. Reliable form automation must verify not only that controls accept input, but also that validation, focus, keyboard behavior, pickers, and submission states work correctly.
What is XCUITest Form Testing?
XCUITest form testing is the process of automating and validating iOS forms with XCUITest, including text fields, secure fields, pickers, switches, buttons, keyboards, validation messages, and form submission workflows.
A typical form workflow looks like this:
Open Form
   ↓
Find Input
   ↓
Enter Data
   ↓
Select Values
   ↓
Handle Keyboard
   ↓
Validate Fields
   ↓
Submit
   ↓
Verify Result
Definition
XCUITest form testing validates how iOS form controls accept user input, manage interaction states, display validation feedback, and submit data through automated UI tests.
Key Points
- Use accessibility identifiers for stable form controls.
- Clear existing text before entering test data.
- Use
typeText()for text input. - Use secure text fields for password scenarios.
- Validate keyboard-related behavior.
- Handle pickers according to their exposed UI hierarchy.
- Test required and optional fields separately.
- Validate inline error messages.
- Test invalid and boundary inputs.
- Verify submit-button state.
- Scroll to controls that are outside the visible viewport.
- Validate the final application state after submission.
- Avoid coordinate-based form interactions.
Why XCUITest Form Testing Matters
Forms combine multiple interaction types in one workflow.
For example:
Registration Form
      ↓
Name
      ↓
Email
      ↓
Password
      ↓
Country Picker
      ↓
Date Picker
      ↓
Terms Switch
      ↓
Keyboard
      ↓
Submit
A test that only checks whether the Submit button works does not provide enough coverage.
A production-grade test should verify the complete interaction contract.
1. Finding Text Fields
Suppose the application exposes:
registration.firstName
registration.lastName
registration.email
The test can locate them directly:
let firstName =
    app.textFields[
        "registration.firstName"
    ]

let email =
    app.textFields[
        "registration.email"
    ]
Then verify availability:
XCTAssertTrue(
    firstName.waitForExistence(
        timeout: 10
    )
)

XCTAssertTrue(
    email.waitForExistence(
        timeout: 10
    )
)
Stable identifiers make form tests less dependent on visible text.
2. Entering Text With typeText()
The standard interaction is:
email.tap()

email.typeText(
    "qa@example.com"
)
A complete example:
let email =
    app.textFields[
        "registration.email"
    ]

XCTAssertTrue(
    email.waitForExistence(
        timeout: 10
    )
)

email.tap()

email.typeText(
    "qa@example.com"
)
The test should interact with the field rather than attempting to manipulate the application through coordinates.
3. Clearing Existing Text
If a field already contains data, clear it before entering the expected value.
One common approach is:
let email =
    app.textFields[
        "registration.email"
    ]

email.tap()

email.press(
    forDuration: 1.0
)
However, selection behavior can vary.
A reusable helper can make clearing behavior consistent:
extension XCUIElement {

    func clearText() {

        guard let value =
            value as? String else {
            return
        }

        tap()

        let deleteCount =
            value.count

        for _ in 0..<deleteCount {
            typeText("\u{8}")
        }
    }
}
Then:
email.clearText()

email.typeText(
    "new@example.com"
)
For production frameworks, keep text-clearing behavior centralized rather than duplicating it across tests.
4. Testing Secure Text Fields
Passwords should normally be exposed as secure text fields.
let password =
    app.secureTextFields[
        "registration.password"
    ]

XCTAssertTrue(
    password.waitForExistence(
        timeout: 10
    )
)

password.tap()

password.typeText(
    "StrongPassword123!"
)
The test can then verify the field exists without asserting the actual password value is visibly displayed.
5. Testing Text Field Validation
Invalid input should be tested deliberately.
let email =
    app.textFields[
        "registration.email"
    ]

email.tap()

email.typeText(
    "invalid-email"
)

app.buttons[
    "registration.submit"
].tap()
Then verify the validation message:
let error =
    app.staticTexts[
        "registration.email.error"
    ]

XCTAssertTrue(
    error.waitForExistence(
        timeout: 5
    )
)
A strong test verifies:
Invalid Input
     ↓
Submit
     ↓
Validation Triggered
     ↓
Error Displayed
     ↓
Form Remains Available
6. Testing Required Fields
A required-field scenario should verify that submission does not proceed without mandatory data.
let submit =
    app.buttons[
        "registration.submit"
    ]

submit.tap()

let error =
    app.staticTexts[
        "registration.name.required"
    ]

XCTAssertTrue(
    error.waitForExistence(
        timeout: 5
    )
)
This validates business behavior rather than simply UI existence.
7. Testing Email Fields
Email fields deserve dedicated validation coverage.
Examples include:
qa@example.com
qa+automation@example.com
qa@subdomain.example.com
invalid-email
qa@
@example.com
A test can use parameterized input:
let email =
    app.textFields[
        "registration.email"
    ]

email.tap()

email.typeText(
    "qa+automation@example.com"
)
Then validate the expected form state.
8. Testing Character Limits
If a field has a maximum length, verify the boundary.
let username =
    app.textFields[
        "profile.username"
    ]

username.tap()

username.typeText(
    String(
        repeating: "a",
        count: 50
    )
)
Then validate the application’s behavior.
For example:
49 characters → Accepted
50 characters → Accepted
51 characters → Rejected / Truncated
The exact expected behavior should come from the application’s requirements.
9. Testing the Keyboard
The keyboard is part of many form workflows.
After focusing a field:
email.tap()the keyboard may appear.
The test can then enter text:
email.typeText(
    "qa@example.com"
)
For a form with multiple fields:
Name
 ↓
Keyboard
 ↓
Email
 ↓
Keyboard
 ↓
Password
 ↓
Keyboard
The test should verify that focus transitions correctly.
10. Dismissing the Keyboard
If the application provides a Done button or another dismissal mechanism:
email.typeText(
    "qa@example.com"
)

app.keyboards.buttons["Done"].tap()
Depending on the keyboard configuration, the exposed control may differ.
Another approach is to tap a visible control that dismisses the keyboard:
app.buttons[
    "form.title"
].tap()
The test should follow the application’s actual UI behavior.
11. Testing Keyboard Return Actions
Different fields may have different return-key behavior:
Next
Next
Done
Go
Search
For example:
email.tap()

email.typeText(
    "qa@example.com"
)

app.keyboards.buttons[
    "Next"
].tap()
Then verify that the next field receives focus.
XCTAssertTrue(
    password.hasKeyboardFocus
)
If direct focus properties are not suitable for the target environment, validate the resulting UI state through the exposed hierarchy.
12. Testing Form Focus Order
A good form should provide predictable focus behavior.
First Name
    ↓ Next
Last Name
    ↓ Next
Email
    ↓ Next
Password
    ↓ Done
A test can validate the sequence through keyboard interactions:
app.textFields[
    "registration.firstName"
].tap()

app.keyboards.buttons["Next"].tap()

app.textFields[
    "registration.lastName"
].tap()
The exact keyboard action exposed depends on the application’s implementation.
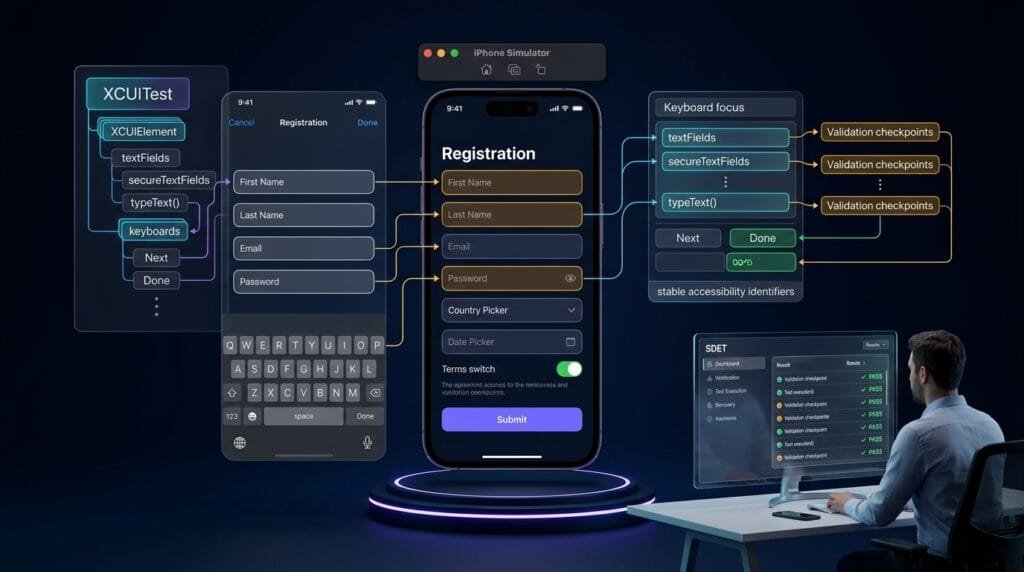
13. Testing Pickers
Pickers allow users to select values rather than type them.
Common examples include:
- Country
- State
- Date
- Time
- Category
- Age
- Quantity
A picker may expose different elements depending on its implementation.
For a picker wheel:
let picker =
    app.pickerWheels.firstMatch

XCTAssertTrue(
    picker.waitForExistence(
        timeout: 10
    )
)
14. Selecting Picker Values
For a picker wheel, you can interact with the exposed picker element.
let picker =
    app.pickerWheels.firstMatch

picker.adjust(
    toPickerWheelValue: "Canada"
)
Then validate the selected state.
XCTAssertTrue(
    app.staticTexts["Canada"].exists
)
The exact query should reflect the application’s accessibility hierarchy.
15. Testing Date Pickers
Date selection can be more complex because the UI may expose multiple picker wheels.
For example:
let datePicker =
    app.datePickers.firstMatch

XCTAssertTrue(
    datePicker.waitForExistence(
        timeout: 10
    )
)
If the application exposes a date picker with accessibility support, the test should interact with its semantic controls rather than screen coordinates.
16. Testing Picker Validation
A form may require a picker selection.
For example:
Country
   ↓
No Selection
   ↓
Submit
   ↓
Country Required
The test:
app.buttons[
    "registration.submit"
].tap()

let error =
    app.staticTexts[
        "registration.country.error"
    ]

XCTAssertTrue(
    error.waitForExistence(
        timeout: 5
    )
)
Then select a valid value and verify that the validation state changes.
17. Testing Switches
Forms often contain switches for preferences or consent.
let terms =
    app.switches[
        "registration.terms"
    ]

XCTAssertTrue(
    terms.waitForExistence(
        timeout: 10
    )
)

terms.tap()
Then verify the state where appropriate.
XCTAssertEqual(
    terms.value as? String,
    "1"
)
The exact exposed value can depend on the control and accessibility configuration, so tests should align with the target application’s hierarchy.
18. Testing Submit Button State
Some forms disable submission until required data is complete.
let submit =
    app.buttons[
        "registration.submit"
    ]

XCTAssertFalse(
    submit.isEnabled
)
After entering required values:
email.tap()
email.typeText(
    "qa@example.com"
)

password.tap()
password.typeText(
    "Password123!"
)
Then:
XCTAssertTrue(
    submit.isEnabled
)
This validates dynamic form behavior.
19. Testing Form Scrolling
Large forms may contain controls outside the visible viewport.
A target can be located first:
let submit =
    app.buttons[
        "registration.submit"
    ]
Then scroll until it becomes interactable:
let scrollView =
    app.scrollViews.firstMatch

for _ in 0..<6 {

    if submit.isHittable {
        break
    }

    scrollView.swipeUp()
}

XCTAssertTrue(
    submit.isHittable
)

submit.tap()
This is preferable to assuming a fixed number of swipes will always work.
20. Testing Forms Inside Scroll Views
A production test should verify that:
- Fields remain accessible while scrolling.
- Focus is preserved appropriately.
- The keyboard does not permanently obscure the target.
- Validation messages remain discoverable.
- Submission remains possible.
- Content is not accidentally reset.
The workflow can be:
Focus Field
   ↓
Keyboard Appears
   ↓
Scroll
   ↓
Next Field
   ↓
Input
   ↓
Dismiss Keyboard
   ↓
Submit
21. Testing Keyboard + Scrolling Together
This is one of the more realistic mobile automation scenarios.
let email =
    app.textFields[
        "registration.email"
    ]

email.tap()

email.typeText(
    "qa@example.com"
)

let password =
    app.secureTextFields[
        "registration.password"
    ]

if !password.isHittable {
    app.scrollViews.firstMatch.swipeUp()
}

password.tap()

password.typeText(
    "Password123!"
)
The test responds to actual visibility rather than blindly scrolling.
22. Testing Input Formatting
Applications may automatically format values.
Examples:
Phone
1234567890
    ↓
(123) 456-7890
or:
Card Number
4242424242424242
    ↓
4242 4242 4242 4242
The test should validate the application’s expected behavior:
let phone =
    app.textFields[
        "profile.phone"
    ]

phone.tap()

phone.typeText(
    "03001234567"
)

XCTAssertEqual(
    phone.value as? String,
    "(030) 012-34567"
)
Use the actual expected format defined by the product requirements.
23. Testing Copy and Paste Behavior
Where supported by the test requirements, clipboard interactions can be validated through the UI.
For example, a field should accept pasted content correctly.
The test should focus on the observable result:
Clipboard Content
      ↓
Paste
      ↓
Text Field
      ↓
Validation
Avoid testing internal implementation details.
24. Testing Invalid Input
A robust form suite should include negative cases.
Examples:
Empty value
Whitespace
Invalid email
Invalid phone
Too short
Too long
Unsupported characters
Malformed date
Invalid selection
For example:
email.tap()

email.typeText(
    "invalid"
)

app.buttons[
    "registration.submit"
].tap()

XCTAssertTrue(
    app.staticTexts[
        "registration.email.error"
    ].exists
)
25. Testing Form Submission
A complete happy-path test can combine all major controls:
func testRegistrationForm() {

    let app = XCUIApplication()
    app.launch()

    let firstName =
        app.textFields[
            "registration.firstName"
        ]

    let email =
        app.textFields[
            "registration.email"
        ]

    let password =
        app.secureTextFields[
            "registration.password"
        ]

    XCTAssertTrue(
        firstName.waitForExistence(
            timeout: 10
        )
    )

    firstName.tap()
    firstName.typeText("John")

    email.tap()
    email.typeText(
        "john@example.com"
    )

    password.tap()
    password.typeText(
        "Password123!"
    )

    app.buttons[
        "registration.submit"
    ].tap()

    XCTAssertTrue(
        app.staticTexts[
            "Registration successful"
        ].waitForExistence(
            timeout: 10
        )
    )
}
This verifies the complete workflow rather than isolated controls.
26. Building a Reusable Form Helper
Repeated form interactions can be centralized.
extension XCUIElement {

    func enterText(
        _ text: String,
        timeout: TimeInterval = 10
    ) {

        XCTAssertTrue(
            waitForExistence(
                timeout: timeout
            )
        )

        tap()
        typeText(text)
    }
}
Usage:
app.textFields[
    "registration.email"
].enterText(
    "qa@example.com"
)
This keeps test cases concise.
27. Page Object for an iOS Form
A form can be represented as a Page Object:
final class RegistrationPage {

    private let app: XCUIApplication

    init(app: XCUIApplication) {
        self.app = app
    }

    private var firstName:
        XCUIElement {
        app.textFields[
            "registration.firstName"
        ]
    }

    private var email:
        XCUIElement {
        app.textFields[
            "registration.email"
        ]
    }

    private var password:
        XCUIElement {
        app.secureTextFields[
            "registration.password"
        ]
    }

    private var submit:
        XCUIElement {
        app.buttons[
            "registration.submit"
        ]
    }

    func register(
        name: String,
        emailAddress: String,
        passwordValue: String
    ) {

        firstName.enterText(name)
        email.enterText(emailAddress)
        password.enterText(passwordValue)

        submit.tap()
    }
}
The test becomes:
let registration =
    RegistrationPage(app: app)

registration.register(
    name: "John",
    emailAddress: "john@example.com",
    passwordValue: "Password123!"
)
The Page Object now owns the form’s interaction details.
Common XCUITest Form Testing Anti-Patterns
Anti-Pattern 1: Coordinate-Based Input
app.coordinate(
    withNormalizedOffset:
        CGVector(dx: 0.5, dy: 0.5)
).tap()
This is fragile across devices and layouts.
Anti-Pattern 2: Fixed Sleeps
sleep(3)The test should wait for a meaningful UI condition instead.
Anti-Pattern 3: Relying Only on Visible Text
Text can change because of:
- Localization
- Product changes
- Dynamic data
Use stable identifiers when possible.
Anti-Pattern 4: Testing Only the Happy Path
Forms need negative and boundary testing.
Anti-Pattern 5: Ignoring Keyboard Behavior
A test can pass on one screen size while failing when the keyboard covers the next control.
Anti-Pattern 6: Blind Scrolling
Do not assume a fixed number of swipes always reaches the target.
Anti-Pattern 7: Validating Only Input
Entering text successfully does not prove that the form works.
Validate:
Input
 ↓
Validation
 ↓
Submission
 ↓
Result
6 Core Pillars of Reliable XCUITest Form Testing
1. Stable Element Identification
Use accessibility identifiers for fields, pickers, switches, errors, and buttons.
2. Realistic User Input
Use tap(), typeText(), picker interaction, switches, and keyboard actions.
3. Validation Coverage
Test valid, invalid, empty, boundary, and formatted values.
4. Keyboard Awareness
Treat keyboard visibility, focus, return actions, and dismissal as part of the workflow.
5. Viewport Awareness
Scroll based on element visibility rather than fixed gesture counts.
6. End-to-End Verification
Validate the final application state after submission.
flowchart TD
    A[Launch Form] --> B[Locate Form Controls]
    B --> C[Enter Text]
    C --> D[Validate Input State]
    D --> E[Select Picker Values]
    E --> F[Handle Keyboard]
    F --> G[Toggle Required Options]
    G --> H{Submit Enabled?}
    H -->|No| I[Validate Form Errors]
    I --> C
    H -->|Yes| J[Tap Submit]
    J --> K[Wait for Result]
    K --> L{Expected Result?}
    L -->|Yes| M[Pass]
    L -->|No| N[Capture Failure Diagnostics]
Key Architectural Takeaways for SDETs
Forms Are Stateful Workflows
A form is not a collection of independent fields.
It is a state machine:
Empty
 ↓
Partially Valid
 ↓
Valid
 ↓
Submitting
 ↓
Success / Failure
Keyboard Behavior Is Part of UI Testing
The keyboard can affect visibility, focus, scrolling, and submission.
Stable Identifiers Reduce Maintenance
Prefer:
app.textFields[
    "registration.email"
]
over fragile positional queries.
Form Validation Must Be Behavioral
Do not only verify that an error label exists.
Verify that:
Invalid Input
 ↓
Validation
 ↓
Correct Error
 ↓
Submission Blocked
Page Objects Keep Tests Maintainable
Form-specific interaction logic belongs in reusable abstractions.
Test the Complete User Journey
The strongest test validates:
Find
 ↓
Input
 ↓
Select
 ↓
Navigate
 ↓
Validate
 ↓
Submit
 ↓
Verify
AI Overview & Answer Engine Optimization
XCUITest form testing is the automated validation of iOS forms, including text fields, secure fields, pickers, switches, keyboards, validation messages, scrolling, and submission behavior.
How Do You Enter Text in XCUITest?
Locate the text field, tap it, and use typeText():
let email =
    app.textFields[
        "registration.email"
    ]

XCTAssertTrue(
    email.waitForExistence(
        timeout: 10
    )
)

email.tap()

email.typeText(
    "qa@example.com"
)
How Do You Test Secure Text Fields?
Use secureTextFields:
let password =
    app.secureTextFields[
        "registration.password"
    ]

password.tap()

password.typeText(
    "Password123!"
)
How Do You Test Pickers in XCUITest?
Use the picker elements exposed by the application’s accessibility hierarchy. For picker wheels:
let picker =
    app.pickerWheels.firstMatch

picker.adjust(
    toPickerWheelValue: "Canada"
)
How Do You Handle Keyboards in XCUITest?
Focus the field, enter text, and interact with the keyboard’s exposed controls when required:
email.tap()

email.typeText(
    "qa@example.com"
)

app.keyboards.buttons["Done"].tap()
The exact keyboard controls depend on the application’s configuration.
How Do You Test iOS Form Validation?
Enter invalid or missing data, submit the form, and verify the expected validation state or error message.
How Do You Test Forms With Scrolling?
Locate the target element and scroll until it becomes hittable:
for _ in 0..<6 {

    if submit.isHittable {
        break
    }

    app.scrollViews.firstMatch.swipeUp()
}
How Do You Make XCUITest Form Tests Reliable?
Use stable accessibility identifiers, condition-based synchronization, reusable helpers, realistic input, keyboard-aware workflows, validation coverage, and final-state assertions.
AI Overview Summary
XCUITest form testing validates iOS text fields, secure fields, pickers, switches, keyboards, validation states, scrolling, and submission workflows. Reliable tests use stable accessibility identifiers, typeText(), picker APIs, condition-based synchronization, keyboard-aware interactions, and behavioral assertions instead of coordinates or fixed delays.
People Asked Questions
What is XCUITest form testing?
It is the automated testing of iOS forms and their controls, including input, validation, selection, keyboard behavior, and submission.
How do I enter text in an XCUITest text field?
Use tap() followed by typeText() on the target XCUIElement.
How do I test a password field?
Use app.secureTextFields to locate the secure input control.
Can XCUITest test picker controls?
Yes. XCUITest can interact with picker controls exposed through the application’s UI accessibility hierarchy.
How do I test form validation?
Provide valid and invalid inputs, submit the form, and assert the expected validation messages or application state.
How do I handle the iOS keyboard during UI tests?
Interact with the field to display the keyboard, enter the required text, and use exposed keyboard controls such as Next or Done when applicable.
How do I test a form that requires scrolling?
Scroll until the target element becomes visible or hittable rather than relying on a fixed number of swipes.
Why should forms use accessibility identifiers?
They provide stable selectors that are less dependent on visible text, localization, and UI layout.
Should XCUITest form tests use sleep()?
No. Prefer condition-based synchronization and explicit UI-state validation.
What should a complete form test validate?
A strong test validates field input, selection, keyboard behavior, validation, submission, and the resulting application state.
Internal Blog Links
- XCUITest iOS Testing: What it is and Why it Matters
- XCTest vs XCUITest: Understanding Apple’s Testing Frameworks
- XCUITest Setup on macOS and Xcode: Complete Beginner’s Guide
- Your First XCUITest: Building a Basic iOS UI Test
- XCUITest Project Structure and Test Target Architecture
- XCUIApplication: Launching and Controlling iOS Apps
- XCUIElement: Finding and Interacting with UI Elements
- iOS Accessibility Identifiers: Build Reliable XCUITest Automation
- XCUITest Locators: IDs, Labels, Text and Element Queries
- XCUITest Actions: Tap, Type, Swipe, Scroll and Long Press
- XCUITest Assertions: Validating iOS App Behavior
- XCUITest Synchronization: Reliable Waiting for iOS UI Tests
- XCUITest Alerts: Handling Alerts, Sheets, Pop-Ups and System Dialogs
Internal Series Links
- Learn MCP – Zero to Hero
- Learn AI Agents for QA – Zero to Hero
- Playwright Automation – Zero to Hero
- TencentDB Agent Memory: Complete Zero to Hero
- LangGraph: Complete Zero to Hero
- Learn Python – Zero to Hero
- OpenAI Codex: Complete Zero to Hero
- Cursor AI: Complete Zero to Hero
- Claude Code Tutorial: Complete Zero to Hero
- AutoGen: Complete Zero to Hero Guide
- Free QA Resources Built From Real Experience
- QA Glossary: Test Automation Terms Every Engineer Should Know
External Links
- Apple — User Interface Tests — Official documentation for creating and running iOS UI tests with XCTest.
- Apple — XCUIElement — Official documentation for interacting with UI elements in XCUITest.
- Apple — XCUIApplication — Official documentation for launching and controlling an application under test.
- Apple — XCUIElementQuery — Official documentation for finding and querying iOS UI elements.
- Apple — XCUIPickerWheel — Official documentation for interacting with picker wheel elements.
- Apple — XCTest — Official XCTest framework documentation covering assertions, expectations, and test execution.
Continue Learning
Explore more expert articles on Mobile Testing, Backend & API, AI & Agentic, AI Tools, n8n, LangChain, CrewAI, MCP Servers, AI Agents, LlamaIndex, Docker, FastAPI, Playwright, Cypress, Test Automation, DevOps, and Software Engineering at www.skakarh.com.
QAPulse by SK delivers expert release analysis, AI engineering insights, enterprise automation strategies, migration guidance, DevOps best practices, and practical testing knowledge to help software professionals build scalable, intelligent, and production-ready software systems.