 QA
QA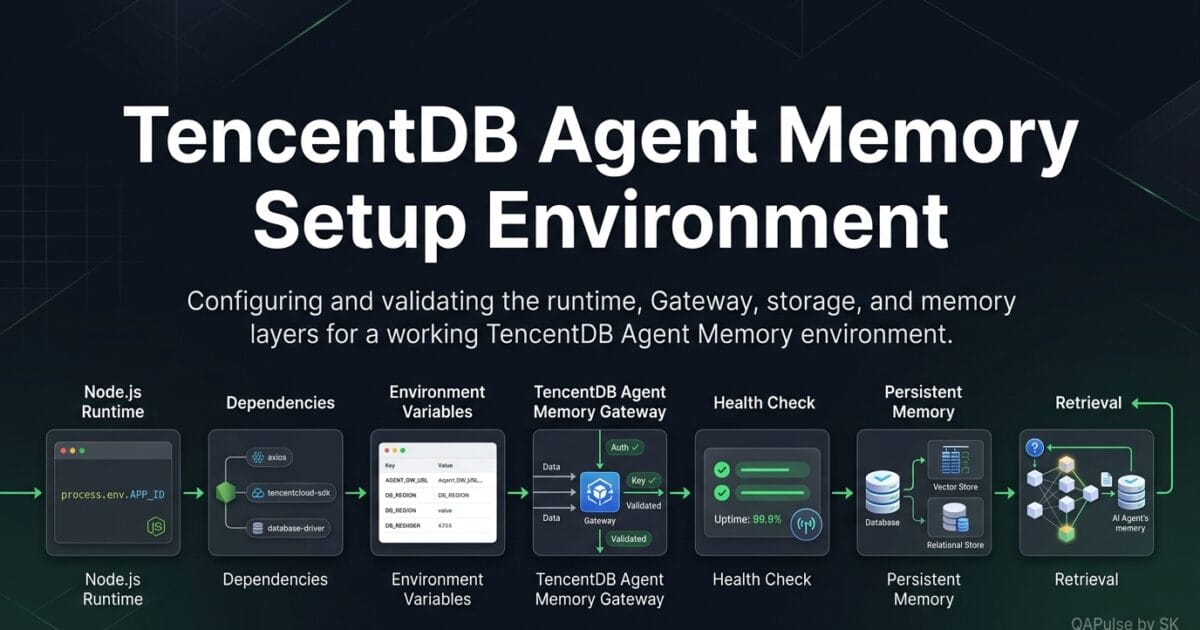
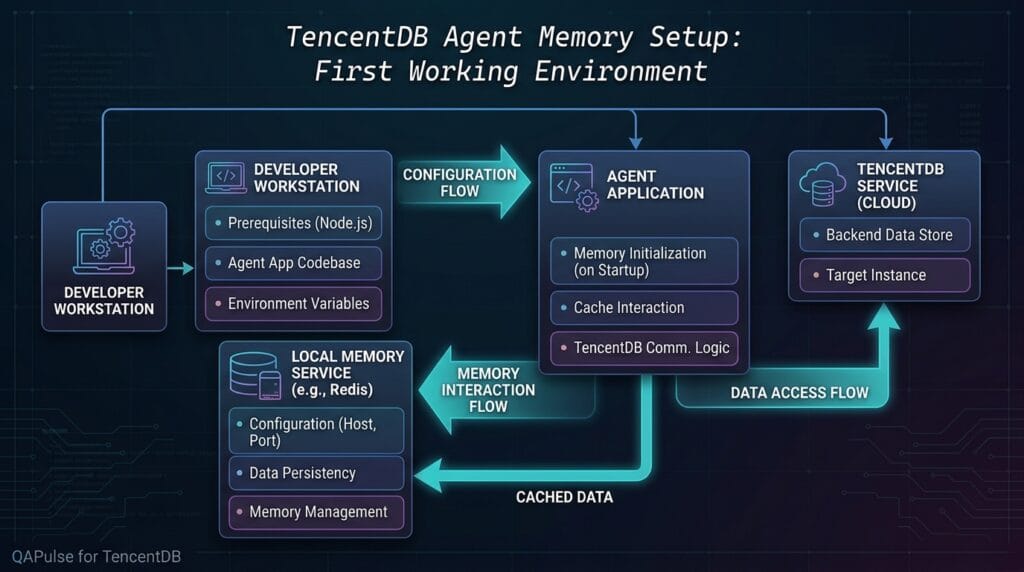
TencentDB Agent Memory Setup is the practical starting point for turning the concepts of persistent Agent memory into a working development environment. After understanding the architecture, storage model, retrieval design, memory layers, and SDK, the next engineering challenge is making the system actually run.
A useful setup should answer five questions before you write application logic:
- What runtime does the project require?
- Which deployment model fits the development goal?
- Which environment variables are required?
- How do you start and verify the memory service?
- How do you know the environment is ready for Agent integration?
The official TencentDB Agent Memory repository currently provides several deployment paths, including a standalone Memory Core, a full Memory Core + Memory Hub + Proxy stack, SDK-based integration, and integrations with Agent platforms such as OpenClaw. The repository is evolving quickly, so version-specific installation documentation should always be checked before reproducing commands from older tutorials. (GitHub)
Start With the Right Deployment Model
There is no single correct installation method for every developer.
For local experimentation, a standalone Memory Core can be enough. The current deployment documentation describes this mode as a zero-external-dependency setup where memory data is stored locally using SQLite and the local filesystem. The default Gateway listens on http://127.0.0.1:8420. (GitHub)
For a broader team-memory environment, the official installation guide provides a three-service stack:
Memory Core
     +
Memory Hub
     +
Memory Proxy
The repository describes this as the recommended full stack when coding Agents need access to team memory, knowledge, and skills through the Proxy. (GitHub)
That gives us an important setup decision:
| Development goal | Recommended direction |
|---|---|
| Learn the memory engine | Standalone Memory Core |
| Experiment locally | Standalone/local deployment |
| Explore team memory | Memory Hub + Memory Core |
| Connect coding Agents | Full Core + Hub + Proxy |
| Build an application | SDK integration |
| Test enterprise-style isolation | Team/Agent/User architecture |
Do not start with the largest deployment simply because it looks more “production-like.”
Start with the smallest environment that lets you validate the concept you are trying to learn.
Check the Runtime Before Installing Anything
A common setup mistake is starting with:
npm install
before checking whether the environment satisfies the project’s requirements.
The current contributor documentation lists Node.js 22.16.0 or newer and npm or pnpm as baseline requirements for the project. (GitHub)
Check your environment first:
node --version
npm --version
For example:
v22.16.0
10.x.x
If your Node.js version is significantly older, fix the runtime first rather than trying to work around installation errors.
A simple environment check can also be automated:
node -e "const major=Number(process.versions.node.split('.')[0]); if(major < 22) { console.error('Node.js 22+ required'); process.exit(1); } console.log('Node.js version OK:', process.version)"
This is particularly useful in CI because the failure happens immediately instead of appearing later as an unrelated dependency or runtime error.
Clone the Project and Inspect the Environment
For a source-based installation, the official repository provides the standard Git workflow:
git clone https://github.com/TencentCloud/TencentDB-Agent-Memory.git
cd TencentDB-Agent-Memory
The repository is organized into separate areas including MemoryCore, MemoryKnowledge, MemoryPanel, MemoryProxy, SDK code, and deployment tooling. (GitHub)
You can inspect the project before installing anything:
ls
Then:
find . -maxdepth 2 -type d | sort
A simplified mental model is:
TencentDB-Agent-Memory/
│
├── MemoryCore/
├── MemoryKnowledge/
├── MemoryPanel/
├── MemoryProxy/
├── sdk/
├── deploy/
├── INSTALL.md
└── README.md
This matters because the repository is not simply a single npm package.
It is becoming an ecosystem around Agent memory.
Install Dependencies for Source Development
For source development, the contributor documentation currently uses:
npm install
The project also supports pnpm in its documented development prerequisites. (GitHub)
After installation, verify the dependency tree:
npm ls --depth=0
Then run the available test suite:
npm test
The repository’s package configuration currently uses Vitest for its test command:
{
  "scripts": {
    "test": "vitest run",
    "test:watch": "vitest"
  }
}
(GitHub)
This is a small but important habit.
A successful dependency installation does not prove that your environment is healthy.
A better validation sequence is:
Runtime check
     ↓
Dependency installation
     ↓
Test execution
     ↓
Configuration validation
     ↓
Service startup
     ↓
Health verification
That is the same mindset you should use when preparing a CI environment for an SDET project.
Configure the Local Memory Core
The standalone deployment documentation shows the Memory Core configuration around three primary LLM settings:
export TDAI_LLM_API_KEY="your-api-key"
export TDAI_LLM_BASE_URL="https://api.example.com/v1"
export TDAI_LLM_MODEL="your-model"
The documentation also lists TDAI_LLM_MAX_TOKENS as an optional configuration parameter. (GitHub)
A local configuration could therefore be represented as:
export TDAI_LLM_API_KEY="replace-with-real-key"
export TDAI_LLM_BASE_URL="https://api.example.com/v1"
export TDAI_LLM_MODEL="your-model"
export TDAI_LLM_MAX_TOKENS=4096
Do not commit these values to Git:
❌ API keys
❌ authentication tokens
❌ private service credentials
❌ production secrets
Instead:
.env
  ↓
local environment
  ↓
application
and make sure .env is excluded from source control.
For example:
.env
.env.*
!.env.example
The goal is to make configuration reproducible without making credentials reproducible.
Start the Memory Gateway
The current standalone deployment documentation provides:
cd MemoryCore
npm install
npx tsx src/gateway/server.ts
The Gateway is documented as listening by default at:
http://127.0.0.1:8420
with local memory data stored beneath:
~/.memory-tencentdb/memory-tdai/
(GitHub)
At this point, don’t immediately connect your full AI Agent.
First prove that the memory environment itself is alive.
A disciplined setup workflow looks like:
Node.js
   ↓
Dependencies
   ↓
Environment variables
   ↓
Memory Core
   ↓
Gateway
   ↓
Health check
   ↓
SDK / Agent
That separation makes debugging dramatically easier.
If the Agent later fails to retrieve memory, you can determine whether the problem belongs to:
Agent
SDK
Network
Authentication
Memory Core
Retrieval
LLM configuration
rather than treating the entire system as one black box.
Standalone Memory Core vs Full Three-Service Stack
The choice becomes clearer when the two approaches are compared.
| Area | Standalone Memory Core | Full Core + Hub + Proxy |
|---|---|---|
| Local learning | Excellent | More complex |
| Memory engine experimentation | Excellent | Excellent |
| Team management | Limited | Designed for it |
| Web panel | Not the focus | Yes |
| Coding Agent integration | Additional work | Built into architecture |
| Knowledge/Skill workflows | Limited | Broader |
| Resource requirements | Lower | Higher |
| First setup | Faster | More involved |
The official installation guide’s full-stack flow clones the repository, moves into deploy/global-images, copies .env.example, edits the environment file, and starts the complete stack with start-all.sh. (GitHub)
git clone https://github.com/TencentCloud/TencentDB-Agent-Memory.git
cd TencentDB-Agent-Memory/deploy/global-images

cp .env.example .env

# Edit the environment configuration
$EDITOR .env

./start-all.sh
For someone learning the technology, this comparison is useful:
Standalone deployment teaches the memory engine. Full deployment teaches the surrounding Agent-memory platform.
Neither is inherently “better.” They answer different engineering needs.
Your First Setup Validation Checklist
Before considering the environment ready, verify:
□ Node.js version satisfies the documented requirement
□ Dependencies install successfully
□ Tests execute successfully
□ LLM configuration is available
□ Secrets are not committed
□ Memory Core starts
□ Gateway is reachable
□ Local storage location is understood
□ Deployment mode matches the learning objective
You can turn those checks into a small shell validation script:
#!/usr/bin/env bash

set -e

echo "Node: $(node --version)"
echo "npm:  $(npm --version)"

node -e "
const major = Number(process.versions.node.split('.')[0]);
if (major < 22) {
  throw new Error('Node.js 22+ is required');
}
"

echo "Runtime validation passed."
The point of this exercise is not the script itself.
It is the mindset:
A working Agent memory environment should be verified systematically before application logic is added.
For the latest installation paths, deployment options, and version-specific requirements, use the project’s official installation and deployment documentation rather than relying on an older tutorial snapshot. (GitHub)
That is particularly important for this project because its architecture and deployment options are actively evolving, with current releases documenting both standalone and service-oriented approaches as well as official TypeScript and Python SDKs. (GitHub)
Choose the Right TencentDB Agent Memory Setup for Your Goal
A reliable TencentDB agent memory setup starts by choosing the correct deployment mode rather than blindly installing every component. The current project documentation distinguishes between standalone deployment and a service-oriented architecture, with the latter designed for multi-space or multi-tenant scenarios. The standalone mode uses SQLite and local files, while the service mode uses Tencent Cloud Vector Database, COS, and Redis for distributed operation. (GitHub)
That gives developers two very different starting points:
| Requirement | Standalone | Service / Team Architecture |
|---|---|---|
| Local learning | Excellent | Usually unnecessary |
| Single Agent | Excellent | Possible but heavier |
| Local experimentation | Excellent | More infrastructure |
| Multi-Agent sharing | Limited | Designed for it |
| Multi-tenant SaaS | No | Yes |
| Kubernetes deployment | Not the primary target | Yes |
| Distributed state | No | Redis-backed |
| Persistent cloud storage | No | TCVDB + COS |
| Infrastructure complexity | Low | Higher |
The practical rule is simple:
Learn with standalone first; introduce distributed services when the application actually requires them.
This avoids spending your first hour debugging Redis, networking, service discovery, and cloud configuration when your actual goal is to understand how Agent memory works.
What the Standalone Environment Actually Contains
The standalone architecture is intentionally small:
                  Your Agent
                     │
                     ▼
              HTTP Gateway
                :8420
                     │
             Memory Core
              /         \
             /           \
        SQLite       Local Files
          │                │
       L0 / L1          L2 / L3
The current deployment documentation describes SQLite plus the local filesystem for standalone storage and identifies the Gateway’s default address as 127.0.0.1:8420. (GitHub)
This is useful because every component is visible.
If retrieval fails, you have fewer moving pieces to investigate.
If persistence fails, you can inspect the local data directory.
If the Gateway does not start, you can diagnose the process directly.
That simplicity is an advantage during development.
Create a Clean Development Environment
Avoid experimenting inside an existing production Agent project on your first installation.
Create an isolated workspace:
mkdir -p ~/ai-memory-lab
cd ~/ai-memory-lab

git clone https://github.com/TencentCloud/TencentDB-Agent-Memory.git
cd TencentDB-Agent-Memory
The official repository provides the source code, deployment scripts, Memory Core, Memory Hub, Proxy, SDKs, and supporting documentation in the same project. (GitHub)
Now check the repository:
git status
git branch --show-current
git log -1 --oneline
This is a surprisingly useful habit when working with fast-moving open-source projects.
You should know which revision you are actually testing.
If a command behaves differently six weeks later, you can determine whether the project changed instead of assuming your machine is broken.
Pin the Version in Real Projects
For experimentation, tracking the current repository can be reasonable.
For production, blindly depending on main is a different story.
A safer pattern is:
Tested commit
      ↓
Integration tests
      ↓
Approved version
      ↓
Production
You can record the revision:
git rev-parse HEAD
Store that value alongside your deployment notes.
This creates a reproducible environment.
Configure LLM Access Carefully
The standalone Gateway needs LLM configuration because memory processing relies on LLM capabilities. The current deployment documentation lists these environment variables:
export TDAI_LLM_API_KEY="your-api-key"
export TDAI_LLM_BASE_URL="https://api.example.com/v1"
export TDAI_LLM_MODEL="your-model"
export TDAI_LLM_MAX_TOKENS=4096
The documentation currently identifies the API key, base URL, model, and maximum token configuration as part of the standalone environment. (GitHub)
For local development, you could use an environment file:
cat > .env <<'EOF'
TDAI_LLM_API_KEY=replace-me
TDAI_LLM_BASE_URL=https://api.example.com/v1
TDAI_LLM_MODEL=your-model
TDAI_LLM_MAX_TOKENS=4096
EOF
But do not put real credentials into Git.
Check your repository:
git status --short
And verify that the environment file is ignored:
.env
.env.*
!.env.example
The distinction between configuration and secrets is important:
Configuration
├── model name
├── endpoint
├── token limits
└── feature flags

Secrets
├── API keys
├── access tokens
└── credentials
Both belong in environment management, but secrets deserve stricter handling.
Use an Environment Template
A good team repository should never force developers to guess which variables are required.
Create:
.env.example
with placeholders:
TDAI_LLM_API_KEY=
TDAI_LLM_BASE_URL=
TDAI_LLM_MODEL=
TDAI_LLM_MAX_TOKENS=4096
Then the setup process becomes:
.env.example
      ↓
copy
      ↓
.env
      ↓
insert local credentials
      ↓
start service
This is better than documenting secrets in a README.
It also makes CI/CD integration much easier later.
Start the Memory Gateway Manually
The current standalone deployment instructions use:
cd MemoryCore
npm install
npx tsx src/gateway/server.ts
The Gateway defaults to:
http://127.0.0.1:8420
and standalone memory data is stored under the user’s ~/.memory-tencentdb/memory-tdai/ directory. (GitHub)
When the process starts, don’t immediately move to Agent integration.
First inspect the process:
ps aux | grep '[t]sx'
Then verify the port:
lsof -i :8420
If your operating system does not provide lsof, an alternative is:
ss -lntp | grep 8420
The goal is to prove that the Gateway is actually listening.
Verify Health Before Testing Memory
The project also provides an operational control script that can check Gateway health:
memory-tencentdb-ctl health
The project’s operational documentation explains that this performs a /health request and provides lifecycle commands such as start, stop, restart, status, health, and logs. (GitHub)
This is a useful production-minded pattern:
Service started
      ↓
Health check
      ↓
Healthy?
   /       \
 Yes        No
 ↓           ↓
Test API    Inspect logs
Never confuse “the process exists” with “the service is healthy.”
These are different states.
Process running
      ≠
Application healthy
      ≠
Memory retrieval working
      ≠
Agent behavior correct
That distinction will become extremely important once you begin automated testing.
Docker Gives You a Different Setup Strategy
If you prefer an isolated environment, Docker is another option.
The current Docker documentation describes a node:22-slim base image for the Memory Core image and exposes port 8420. It also provides separate configuration templates for standalone and service deployments. (GitHub)
A basic image build from MemoryCore is documented as:
cd MemoryCore

docker build \
  -t tencentdb-agent-memory:latest \
  .
You can then inspect the image:
docker images | grep tencentdb-agent-memory
Docker is especially useful when your team wants:
Same Node runtime
Same dependencies
Same configuration model
Same startup process
Same CI environment
instead of asking every developer to reproduce the environment manually.
Native Setup vs Docker
| Factor | Native | Docker |
|---|---|---|
| First-time learning | Easier | Moderate |
| Process debugging | Easier | Slightly more complex |
| Environment isolation | Lower | Higher |
| CI consistency | Moderate | Excellent |
| Portability | Moderate | Excellent |
| Local file access | Simple | Requires volume planning |
| Runtime control | Host-controlled | Container-controlled |
For an individual learning the platform, native standalone setup is usually the clearest starting point.
For a team building repeatable environments, Docker becomes more attractive.
Do Not Jump to the Full Three-Service Stack Too Early
The current full installation guide provides a three-in-one deployment containing:
Memory Core
Memory Hub
Proxy
The official guide describes this as the recommended full stack for coding Agents that need access to team memory, knowledge, and skills through the Proxy. The setup uses the deployment scripts under deploy/global-images, a .env file, and start-all.sh. (GitHub)
The documented flow is:
git clone https://github.com/TencentCloud/TencentDB-Agent-Memory.git

cd TencentDB-Agent-Memory/deploy/global-images

cp .env.example .env

$EDITOR .env

./start-all.sh
The full stack also exposes a web panel at:
http://localhost:8125
according to the current repository documentation. (GitHub)
This architecture is powerful, but it introduces additional troubleshooting surfaces:
Agent
  ↓
Proxy
  ↓
Memory Hub
  ↓
Memory Core
  ↓
Storage
A failure could originate anywhere in that chain.
For that reason, use the full stack when your learning objective actually requires:
- team memory
- shared knowledge
- reusable skills
- Proxy-based Agent integration
- multi-Agent workflows
- broader platform testing
Make Your Setup Reproducible
A professional TencentDB agent memory setup should be something another engineer can reproduce.
Create a small setup document:
# Local Agent Memory Environment

## Runtime
- Node.js: 22.16+
- Package manager: npm

## Deployment
- Standalone Memory Core

## Gateway
- http://127.0.0.1:8420

## Configuration
- TDAI_LLM_API_KEY
- TDAI_LLM_BASE_URL
- TDAI_LLM_MODEL
- TDAI_LLM_MAX_TOKENS

## Validation
- Dependencies installed
- Tests passed
- Gateway healthy
Now another developer has a deterministic starting point.
Better still, automate the validation.
#!/usr/bin/env bash

set -euo pipefail

echo "Checking Node.js..."
node --version

echo "Checking npm..."
npm --version

echo "Checking required variables..."

required_vars=(
  TDAI_LLM_API_KEY
  TDAI_LLM_BASE_URL
  TDAI_LLM_MODEL
)

for variable in "${required_vars[@]}"; do
  if [[ -z "${!variable:-}" ]]; then
    echo "Missing: $variable"
    exit 1
  fi
done

echo "Environment validation passed."
This is where setup becomes engineering rather than a collection of copy-paste commands.
A Simple Setup Decision Exercise
Before continuing, choose your environment based on the scenario:
Scenario A: You want to understand persistent Agent memory on your laptop.
Use:
Standalone Memory Core
Scenario B: You want to experiment with a coding Agent and shared team memory.
Use:
Memory Core + Memory Hub + Proxy
Scenario C: You want to test a multi-tenant SaaS architecture.
Investigate:
Service deployment
+
TCVDB
+
COS
+
Redis
The current deployment documentation explicitly positions standalone mode for local development and single-Agent scenarios, while service mode targets multi-space, Kubernetes, multi-Agent, and SaaS-style environments. (GitHub)
That means the correct question is not:
“Which setup is the most advanced?”
It is:
“Which setup matches the system I am trying to build?”
Treat Setup as the First Test
There is one final mindset shift worth making.
Your first successful setup should itself become a test case.
Test Case: Environment Boot

Given:
    Valid Node.js runtime
    Valid LLM configuration

When:
    Memory Core starts

Then:
    Gateway becomes reachable
    Health check succeeds
    Memory storage is available
You can later turn this into an automated smoke test:
describe("memory environment", () => {
  it("should expose a healthy Gateway", async () => {
    const response = await fetch(
      "http://127.0.0.1:8420/health"
    );

    expect(response.ok).toBe(true);
  });
});
If the endpoint or response contract changes between project versions, update the test according to the current official API rather than treating this example as a version-independent contract.
That is exactly why environment setup should be documented with the specific project revision, runtime, configuration, and deployment mode you validated.
The official repository itself notes that Agent Memory is still evolving and welcomes benchmark reproductions, bug reports, documentation improvements, and ecosystem contributions. (GitHub)
A reproducible environment therefore does more than help one developer.
It gives your entire team a known baseline from which Agent-memory experiments can be compared, tested, and debugged.
Validate the Environment Before You Trust the Memory Layer
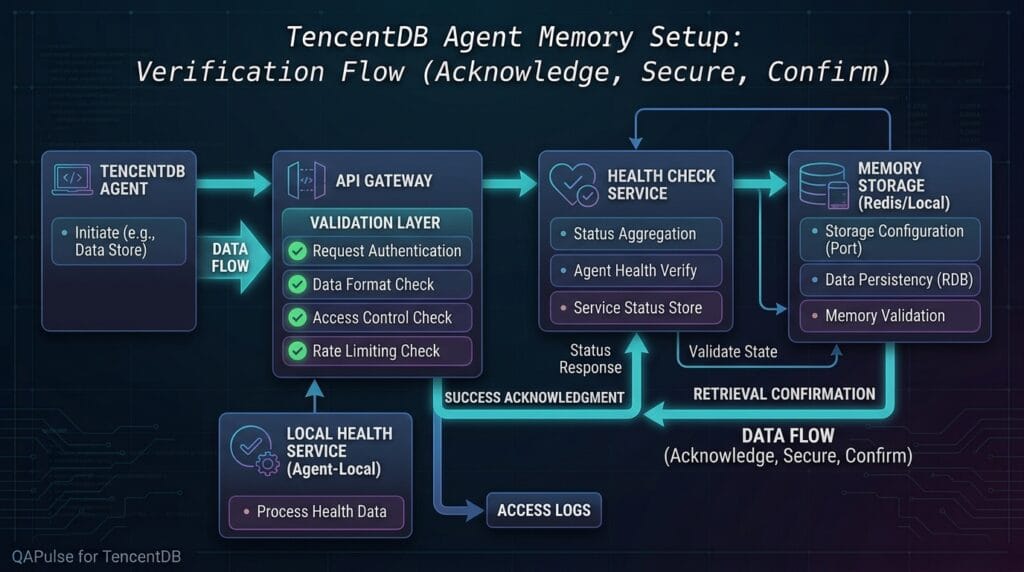
A TencentDB Agent Memory Setup should not be considered complete merely because the Gateway process starts. The more important question is whether the environment behaves correctly when an Agent writes, persists, retrieves, and reuses information.
This distinction is critical:
Process starts
     ↓
Gateway responds
     ↓
Memory can be written
     ↓
Memory survives restart
     ↓
Memory can be retrieved
     ↓
Agent can use the retrieved context
Each layer represents a different validation target.
The official project currently describes the standalone environment as a local deployment using SQLite and local files, while the broader architecture supports Memory Core, Memory Hub, and Memory Proxy for team-oriented Agent workflows. (GitHub)
Test the Gateway First
Once the Gateway is running, start with the simplest possible check:
curl http://127.0.0.1:8420/health
The current project documentation shows the health endpoint returning a status such as:
{
  "status": "ok"
}
A degraded status can also be reported depending on the environment and available dependencies. (GitHub)
This gives you a useful diagnostic hierarchy:
| Result | What it tells you |
|---|---|
| Connection refused | Gateway is not listening |
| Timeout | Process/network problem |
| HTTP error | Gateway is reachable but configuration may be wrong |
ok | Basic health check succeeded |
degraded | Service is responding but some capability needs investigation |
Do not immediately interpret an HTTP response as proof that memory itself works.
You have only proved that the Gateway answered.
Add a Repeatable Health Check
For development teams, manually typing curl every time is unnecessary.
Create:
#!/usr/bin/env bash

set -euo pipefail

URL="http://127.0.0.1:8420/health"

echo "Checking TencentDB Agent Memory Gateway..."

response=$(curl -fsS "$URL")

echo "Gateway response:"
echo "$response"

echo "Gateway is reachable."
Make it executable:
chmod +x health-check.sh
Run:
./health-check.sh
This tiny script becomes useful later in:
- Docker health checks
- CI pipelines
- local smoke tests
- deployment scripts
- troubleshooting documentation
That is a better engineering approach than relying on visual confirmation from a terminal window.
Verify Configuration Without Exposing Secrets
A common mistake is debugging configuration by printing the entire environment:
env
That can expose API keys and credentials.
Instead, inspect only non-sensitive variables:
echo "$TDAI_LLM_BASE_URL"
echo "$TDAI_LLM_MODEL"
echo "$TDAI_LLM_MAX_TOKENS"
For the secret, test whether it exists without printing it:
if [[ -n "${TDAI_LLM_API_KEY:-}" ]]; then
  echo "LLM API key is configured."
else
  echo "LLM API key is missing."
  exit 1
fi
This creates a much safer diagnostic pattern.
Bad diagnostic
     ↓
print everything
     ↓
possibly expose credentials

Better diagnostic
     ↓
check presence
     ↓
print safe metadata only
The repository’s current configuration uses variables such as TDAI_LLM_API_KEY, TDAI_LLM_BASE_URL, TDAI_LLM_MODEL, and TDAI_LLM_MAX_TOKENS for the Gateway environment. (GitHub)
Validate Persistence, Not Just Availability
This is where a TencentDB Agent Memory Setup becomes a genuine memory test.
Imagine your Agent learns:
"My preferred test framework is Playwright."
If the system remembers it only during the current process, you have temporary context.
If it can retrieve the information after restarting the service, you have demonstrated persistence.
The conceptual test is:
Session 1
   ↓
Store memory
   ↓
Stop Gateway
   ↓
Start Gateway
   ↓
Session 2
   ↓
Retrieve memory
That is a much stronger test than:
Store → Retrieve
because the second test could succeed using an in-process cache.
Think Like an SDET
A useful test matrix is:
| Test | Write | Restart | Retrieve | Expected |
|---|---|---|---|---|
| Current-session memory | ✓ | No | ✓ | Available |
| Restart persistence | ✓ | Yes | ✓ | Available |
| Missing memory | No | No | ✓ | No false match |
| Multiple memories | ✓ | No | ✓ | Relevant results |
| Configuration failure | ✓ | No | ✓ | Controlled failure |
| Empty environment | No | No | ✓ | Graceful response |
This approach turns setup into an observable engineering system.
Instead of saying:
“It seems to work.”
you can say:
“The Gateway is reachable, configuration is valid, memory persists across restart, and retrieval returns the expected context.”
That is the kind of evidence that makes technical documentation trustworthy.
Understand Local Storage Before Debugging Retrieval
The current standalone deployment documentation identifies the local data directory as:
~/.memory-tencentdb/memory-tdai/
and describes SQLite plus the local filesystem as the storage approach for standalone operation. (GitHub)
You can inspect the directory:
ls -la ~/.memory-tencentdb/
Then:
find ~/.memory-tencentdb/memory-tdai \
  -maxdepth 2 \
  -type f | head -50
Do not modify or delete files simply because their names are unfamiliar.
First understand what generated them.
This is particularly important when debugging persistence.
A developer who immediately deletes the storage directory after every failed test may accidentally remove the evidence needed to diagnose the failure.
Separate Memory Failures From LLM Failures
One of the most useful debugging strategies is separating the system into responsibilities.
Consider:
                Agent
                  │
                  ▼
             Memory API
                  │
        ┌─────────┴─────────┐
        ▼                   ▼
   Storage Layer       LLM Processing
        │                   │
        ▼                   ▼
 SQLite / Files       Extraction / Synthesis
A failed memory operation does not automatically mean the database is broken.
For example:
| Symptom | Possible area |
|---|---|
| Gateway unavailable | Runtime / process |
| Gateway healthy but extraction fails | LLM configuration |
| Memory written but unavailable after restart | Persistence |
| Memory exists but wrong result returned | Retrieval |
| Correct memory returned but Agent ignores it | Agent integration |
| Everything works locally but not in Docker | Environment/configuration |
This is one reason the project’s layered architecture matters.
The repository describes a four-layer memory model covering conversation recording, structured memory extraction, scene-level memory, and persona generation. (GitHub)
Testing each responsibility separately gives you much better diagnostic information.
Compare This With Traditional Application Setup
Traditional database setup often looks like:
Application
    ↓
Database
    ↓
CRUD
Agent memory is more complicated:
Agent
   ↓
Conversation
   ↓
Memory extraction
   ↓
Memory representation
   ↓
Storage
   ↓
Retrieval
   ↓
Context injection
   ↓
Agent reasoning
That difference changes how you should validate the environment.
| Traditional database | Agent memory |
|---|---|
| Insert row | Extract memory |
| Query row | Retrieve relevant context |
| Update record | Consolidate/refine memory |
| Delete record | Remove memory |
| Connection test | Gateway health test |
| Data persistence | Cross-session persistence |
| Query correctness | Retrieval relevance |
If you test only whether the HTTP service responds, you are testing connectivity—not Agent memory.
Test the Configuration Boundary
A strong environment should fail clearly when required configuration is missing.
For example:
unset TDAI_LLM_API_KEY
Then attempt to start the relevant service.
You want an actionable failure rather than a mysterious downstream error.
A useful validation function looks like:
require_env() {
  local name="$1"

  if [[ -z "${!name:-}" ]]; then
    echo "ERROR: Missing required variable: $name"
    exit 1
  fi
}

require_env TDAI_LLM_API_KEY
require_env TDAI_LLM_BASE_URL
require_env TDAI_LLM_MODEL

echo "Required configuration is present."
The principle is transferable to every AI system:
Validate configuration at the boundary where it enters the system.
Do not allow an invalid environment to travel through five services before producing an error.
Native Installation and Containerized Validation
There is also a strategic reason to test both native and containerized environments.
The project’s Docker documentation currently provides a Memory Core image based on node:22-slim, exposes port 8420, and distinguishes standalone and service configuration templates. (GitHub)
Conceptually:
Native
Developer machine
     ↓
Node.js
     ↓
Memory Core
versus:
Docker
Host
 ↓
Container
 ↓
Node.js
 ↓
Memory Core
The application should behave consistently in both environments, subject to configuration and storage differences.
A practical comparison:
| Validation area | Native | Docker |
|---|---|---|
| Runtime | Host Node.js | Container Node.js |
| Filesystem | Direct | Mounted/managed |
| Port | Host | Published container port |
| Dependency isolation | Lower | Higher |
| Reproducibility | Moderate | High |
| Debugging | Simpler | More layers |
For a personal learning environment, native execution gives you faster visibility.
For a repeatable team environment, containers provide stronger isolation.
Use Smoke Tests Instead of Manual Guessing
Once your Gateway is running, create a smoke-test suite.
For example:
const BASE_URL = "http://127.0.0.1:8420";

async function checkHealth() {
  const response = await fetch(`${BASE_URL}/health`);

  if (!response.ok) {
    throw new Error(
      `Gateway health check failed: ${response.status}`
    );
  }

  return response.json();
}

checkHealth()
  .then(result => {
    console.log("Gateway:", result);
  })
  .catch(error => {
    console.error(error);
    process.exit(1);
  });
This gives you a foundation for automated environment testing.
Later, you can extend the same pattern:
Health
  ↓
Authentication
  ↓
Write memory
  ↓
Read memory
  ↓
Restart
  ↓
Read again
  ↓
Validate relevance
This is much closer to how a production SDET would validate an Agent-memory platform.
Be Careful With Version Drift
The official repository is actively changing.
The current main repository documentation lists Node.js >=22.16.0 as a prerequisite, while current releases also document official TypeScript and Python SDKs and evolving v3 isolation behavior. (GitHub)
That means a command copied from an older article may not represent today’s recommended workflow.
For reproducibility, record:
node --version
npm --version
git rev-parse HEAD
You can store the result:
Environment
Node.js: 22.x
Package manager: npm
Repository revision: <commit>
Deployment: standalone
Gateway: 127.0.0.1:8420
Now your troubleshooting conversation becomes precise:
“The test failed on commit X using Node 22.x.”
instead of:
“TencentDB memory doesn’t work.”
That difference matters enormously when working with rapidly evolving AI infrastructure.
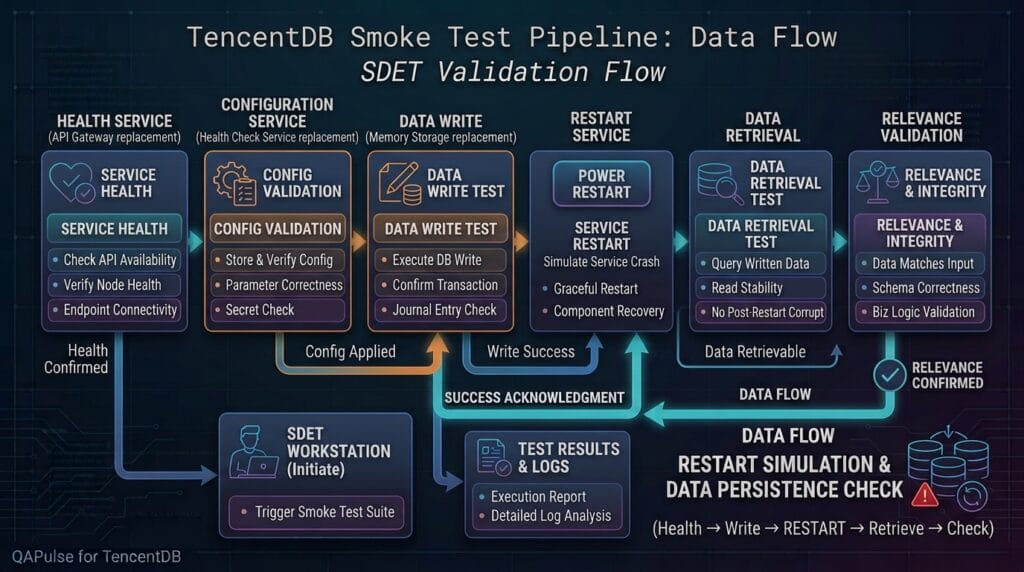
Build a Practical Environment Readiness Gate
You can now convert everything into one readiness gate:
┌──────────────────────────────┐
│ Environment Readiness Gate   │
├──────────────────────────────┤
│ Runtime valid?               │
│ Dependencies installed?      │
│ Configuration present?       │
│ Gateway healthy?             │
│ Storage available?           │
│ Memory write works?          │
│ Memory survives restart?     │
│ Retrieval is relevant?       │
└──────────────────────────────┘
Automate as many of these checks as possible.
A simple Bash gate could begin with:
#!/usr/bin/env bash

set -euo pipefail

echo "=== Environment Readiness ==="

node --version
npm --version

: "${TDAI_LLM_API_KEY:?Missing TDAI_LLM_API_KEY}"
: "${TDAI_LLM_BASE_URL:?Missing TDAI_LLM_BASE_URL}"
: "${TDAI_LLM_MODEL:?Missing TDAI_LLM_MODEL}"

curl -fsS http://127.0.0.1:8420/health

echo
echo "Environment readiness checks passed."
Notice what this script does not do.
It does not print the API key.
It does not assume that a running process means the memory system is correct.
It checks observable conditions.
That is the difference between a tutorial installation and an engineering-grade environment.
The Most Important Setup Principle
A strong TencentDB Agent Memory Setup is not measured by how many services you managed to launch.
It is measured by whether you can explain the complete path:
Configuration
     ↓
Gateway
     ↓
Memory Core
     ↓
Memory processing
     ↓
Storage
     ↓
Retrieval
     ↓
Agent context
You should know where each responsibility lives.
You should know which component failed when something goes wrong.
You should be able to reproduce the environment.
And you should be able to prove that memory persists rather than merely assuming it does.
That mindset will also make later Agent integration substantially easier because you are building on a verified foundation instead of debugging the Agent and infrastructure simultaneously.
The official TencentDB Agent Memory repository and deployment documentation should remain the source of truth for version-specific commands, configuration names, and supported deployment modes. (GitHub)
Turn a Successful Installation Into a Reproducible TencentDB Agent Memory Setup
A reliable TencentDB Agent Memory Setup should be reproducible, testable, and easy for another engineer to understand. Starting the Gateway once is useful, but it is not enough to establish that your environment is ready for real Agent-memory workloads.
The real validation target is this:
Runtime
   ↓
Dependencies
   ↓
Configuration
   ↓
Gateway
   ↓
Health
   ↓
Memory write
   ↓
Memory persistence
   ↓
Memory retrieval
   ↓
Agent consumption
The current TencentDB Agent Memory documentation supports both standalone and service deployment models. Standalone uses SQLite and local files, while service mode is designed around distributed infrastructure such as Tencent Cloud Vector Database, COS, and Redis. (GitHub)
That distinction should influence how you validate your environment.
Verify the Environment as a System
Start with the basic runtime:
node --version
npm --version
The current contributor documentation requires Node.js 22.16.0 or newer and supports npm or pnpm. (GitHub)
Then verify the repository revision:
git rev-parse --short HEAD
git status
This matters because an evolving AI infrastructure project can change its APIs, configuration, deployment scripts, and SDK behavior.
A reproducible environment should therefore record:
Node.js version
Package manager
Git commit
Deployment mode
Gateway port
LLM configuration
Storage configuration
A simple environment report can be generated with:
echo "Node: $(node --version)"
echo "npm:  $(npm --version)"
echo "Git:  $(git rev-parse --short HEAD)"
echo "Mode: ${TDAI_DEPLOY_MODE:-standalone}"
echo "Port: ${TDAI_GATEWAY_PORT:-8420}"
This gives you evidence instead of assumptions.
Validate Dependencies Before Debugging the Gateway
Install the project dependencies:
npm install
Then run the project’s tests:
npm test
The repository currently uses Vitest for its test command. (GitHub)
A useful setup pipeline is therefore:
node --version
      ↓
npm install
      ↓
npm test
      ↓
configure environment
      ↓
start Gateway
Do not reverse this order unnecessarily.
If the test suite already fails before the Gateway starts, you have a development-environment problem rather than a memory-service problem.
Validate the Gateway Independently
The current standalone deployment documentation uses:
cd MemoryCore
npm install

export TDAI_LLM_API_KEY="your-api-key"
export TDAI_LLM_BASE_URL="https://api.deepseek.com/v1"
export TDAI_LLM_MODEL="deepseek-chat"

npx tsx src/gateway/server.ts
The default Gateway address is:
http://127.0.0.1:8420
and the standalone data directory defaults to:
~/.memory-tencentdb/memory-tdai/
(GitHub)
Now perform the simplest possible health check:
curl http://127.0.0.1:8420/health
The current documentation identifies /health as the health endpoint. (GitHub)
A healthy response should provide an indication that the service is operational. Current Docker documentation shows a response containing fields such as:
{
  "status": "ok",
  "version": "0.1.0",
  "services": {
    "stateBackend": "connected"
  }
}
The exact response can vary with the deployed version and mode, so validate against the version you actually installed. (GitHub)
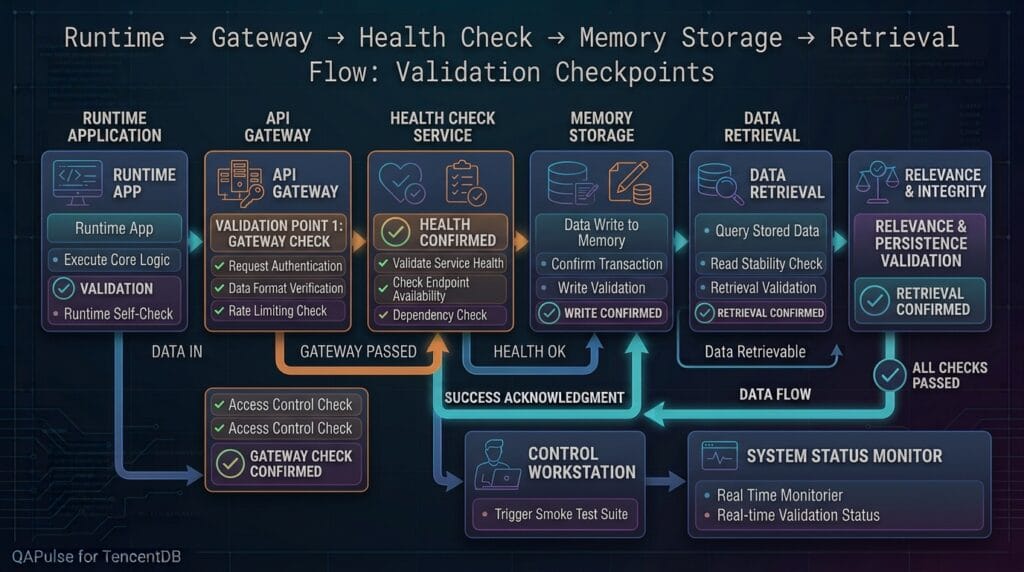
This is important:
Gateway reachable
        ≠
Memory validated
You have only established that the HTTP service is responding.
Test Configuration Without Leaking Credentials
Never debug your environment by dumping every environment variable:
env
That can expose API keys.
Instead, verify safe configuration values:
echo "$TDAI_LLM_BASE_URL"
echo "$TDAI_LLM_MODEL"
echo "$TDAI_LLM_MAX_TOKENS"
For the credential itself, check only whether it exists:
if [[ -n "${TDAI_LLM_API_KEY:-}" ]]; then
  echo "LLM API key configured"
else
  echo "LLM API key missing"
  exit 1
fi
The current deployment reference documents variables including:
TDAI_LLM_API_KEY
TDAI_LLM_BASE_URL
TDAI_LLM_MODEL
TDAI_LLM_MAX_TOKENS
along with Gateway configuration such as TDAI_DEPLOY_MODE, TDAI_GATEWAY_PORT, TDAI_GATEWAY_HOST, and TDAI_DATA_DIR. (GitHub)
This separation is a good engineering habit:
Safe to log
├── runtime version
├── model name
├── endpoint
├── deployment mode
└── port

Never log
├── API keys
├── bearer tokens
└── private credentials
Prove That Persistence Actually Works
This is the most important validation step.
Suppose an Agent learns:
The test suite uses Playwright.
A real memory system should eventually allow that information to be available beyond the immediate interaction, depending on the memory layer and processing lifecycle involved.
Your conceptual test should therefore be:
Session A
   ↓
Capture information
   ↓
Persist
   ↓
Stop Gateway
   ↓
Restart Gateway
   ↓
Session B
   ↓
Retrieve information
Compare that with a simple in-process test:
Write
  ↓
Read
The second test is weaker because it does not establish persistence across a process boundary.
For an SDET-oriented validation strategy, define the test explicitly:
| Scenario | Write | Restart | Read | Expected |
|---|---|---|---|---|
| Same-session memory | Yes | No | Yes | Relevant result |
| Persistent memory | Yes | Yes | Yes | Relevant result |
| Unknown information | No | No | Yes | No false memory |
| Multiple memories | Yes | No | Yes | Correct relevance |
| Missing configuration | No | No | No | Controlled failure |
This transforms your setup into an actual testable system.
Understand the Storage Boundary
For standalone deployment, the current documentation describes:
SQLite
+
Local filesystem
with the default data location under:
~/.memory-tencentdb/memory-tdai/
(GitHub)
Inspect the directory carefully:
find ~/.memory-tencentdb/memory-tdai \
  -maxdepth 2 \
  -type f | head -50
Do not delete storage just because a test failed.
First determine what generated the files.
A useful debugging model is:
Memory missing
     ↓
Was it captured?
     ↓
Was it persisted?
     ↓
Is storage available?
     ↓
Was retrieval executed?
     ↓
Was the query relevant?
     ↓
Did the Agent consume the result?
This prevents the common mistake of blaming “the database” for every memory problem.
Compare Database Testing With Agent-Memory Testing
Traditional database validation usually focuses on CRUD:
Create
Read
Update
Delete
Agent-memory validation adds semantic behavior:
Conversation
     ↓
Extraction
     ↓
Memory formation
     ↓
Storage
     ↓
Retrieval
     ↓
Relevance
     ↓
Context injection
That produces a different test philosophy.
| Traditional database | Agent memory |
|---|---|
| Row exists | Memory is represented correctly |
| Query returns row | Retrieval returns relevant context |
| Update succeeds | Memory can evolve |
| Delete succeeds | Outdated memory disappears |
| Connection works | Gateway and dependencies work |
| Persistence test | Cross-session memory test |
| Query correctness | Semantic retrieval correctness |
This is why a successful /health request is only the beginning.
Validate Failure Conditions Deliberately
Good setup testing does not test only successful scenarios.
Temporarily remove a required variable:
unset TDAI_LLM_API_KEY
Then run your validation script.
A useful validation function is:
require_env() {
  local variable="$1"

  if [[ -z "${!variable:-}" ]]; then
    echo "ERROR: $variable is not configured"
    exit 1
  fi
}

require_env TDAI_LLM_API_KEY
require_env TDAI_LLM_BASE_URL
require_env TDAI_LLM_MODEL
Now your environment fails early.
That is preferable to allowing a missing configuration value to travel through several components and produce an unrelated error later.
The engineering principle is:
Fail close to the configuration boundary.
This makes troubleshooting faster and error messages more meaningful.
Build a Small Automated Smoke Test
You can turn the environment validation into a repeatable TypeScript test:
const BASE_URL = "http://127.0.0.1:8420";

async function checkGateway() {
  const response = await fetch(`${BASE_URL}/health`);

  if (!response.ok) {
    throw new Error(
      `Gateway returned HTTP ${response.status}`
    );
  }

  return response.json();
}

checkGateway()
  .then(result => {
    console.log("Gateway health:", result);
  })
  .catch(error => {
    console.error("Gateway validation failed:", error);
    process.exit(1);
  });
Now the test can run from:
Developer laptop
CI pipeline
Docker environment
Deployment verification
The advantage is consistency.
A human might forget a step.
An automated smoke test does not.
Native Installation vs Docker
The current project also provides Docker-based deployment options. Its Docker documentation describes standalone and service configurations, with the standalone container exposing port 8420. It also documents a Docker Compose option for local startup. (GitHub)
A native environment looks like:
Host
 │
 ├── Node.js
 │
 └── Memory Core
A Docker environment looks like:
Host
 │
 └── Container
       │
       ├── Node.js
       └── Memory Core
Compare them:
| Area | Native | Docker |
|---|---|---|
| Learning | Easier | Moderate |
| Isolation | Lower | Higher |
| Debugging | Direct | Container-aware |
| Reproducibility | Moderate | Strong |
| CI/CD | Good | Excellent |
| Filesystem | Simple | Volume-aware |
| Team consistency | Moderate | Strong |
Neither approach is universally superior.
For understanding the internals, native execution provides excellent visibility.
For repeatable team environments, containers can provide stronger consistency.
Validate the Full Architecture When Required
The current official installation guide also supports a three-service architecture:
Memory Core
     +
Memory Hub
     +
Proxy
The project describes this configuration as a way for coding Agents such as Claude Code to consume team memory, knowledge, and skills through the Proxy. (GitHub)
The documented startup flow is:
git clone https://github.com/TencentCloud/TencentDB-Agent-Memory.git

cd TencentDB-Agent-Memory/deploy/global-images

cp .env.example .env

$EDITOR .env

./start-all.sh
The project documentation currently identifies the web panel at:
http://localhost:8125
(GitHub)
The important lesson is not simply how to run the command.
It is knowing when to use this architecture.
Learning local memory
        ↓
Standalone

Team memory
        ↓
Memory Core + Hub

Coding Agent integration
        ↓
Core + Hub + Proxy

Multi-tenant distributed system
        ↓
Service architecture
The current deployment documentation explicitly differentiates standalone and service modes by storage, state management, multi-tenancy, and deployment scale. (GitHub)
Create an Environment Readiness Gate
Bring the checks together:
┌────────────────────────────────────┐
│     Environment Readiness Gate     │
├────────────────────────────────────┤
│ Node.js version valid?             │
│ Dependencies installed?            │
│ Tests passing?                     │
│ LLM configuration available?       │
│ Gateway reachable?                 │
│ Health check passing?              │
│ Storage accessible?                │
│ Memory persistence verified?       │
│ Retrieval validated?               │
│ Secrets protected?                 │
└────────────────────────────────────┘
A Bash implementation could look like:
#!/usr/bin/env bash

set -euo pipefail

echo "=== Agent Memory Environment ==="

echo "Node: $(node --version)"
echo "npm:  $(npm --version)"

: "${TDAI_LLM_API_KEY:?Missing TDAI_LLM_API_KEY}"
: "${TDAI_LLM_BASE_URL:?Missing TDAI_LLM_BASE_URL}"
: "${TDAI_LLM_MODEL:?Missing TDAI_LLM_MODEL}"

echo "Required configuration detected."

curl -fsS \
  http://127.0.0.1:8420/health

echo
echo "Environment checks passed."
The result is not merely a running application.
It is an environment with measurable readiness criteria.
Document the Exact Environment You Tested
Create a small record:
# TencentDB Agent Memory Environment

Runtime:
- Node.js: 22.x
- npm: 10.x

Deployment:
- standalone

Gateway:
- 127.0.0.1:8420

Storage:
- local SQLite
- local filesystem

Validation:
- dependencies installed
- tests executed
- health endpoint verified
- persistence tested

Repository:
- commit: <validated-commit>
This becomes extremely valuable when debugging future changes.
Instead of saying:
“It worked on my machine.”
you can say:
“It worked with this Node version, repository revision, deployment mode, and configuration.”
That is a much stronger engineering statement.
The official project is actively evolving, and its current releases include dedicated TypeScript and Python SDKs alongside changes to memory isolation and deployment capabilities. (GitHub)
Therefore, version-aware documentation is not optional for serious implementations.
From Setup to Engineering Confidence
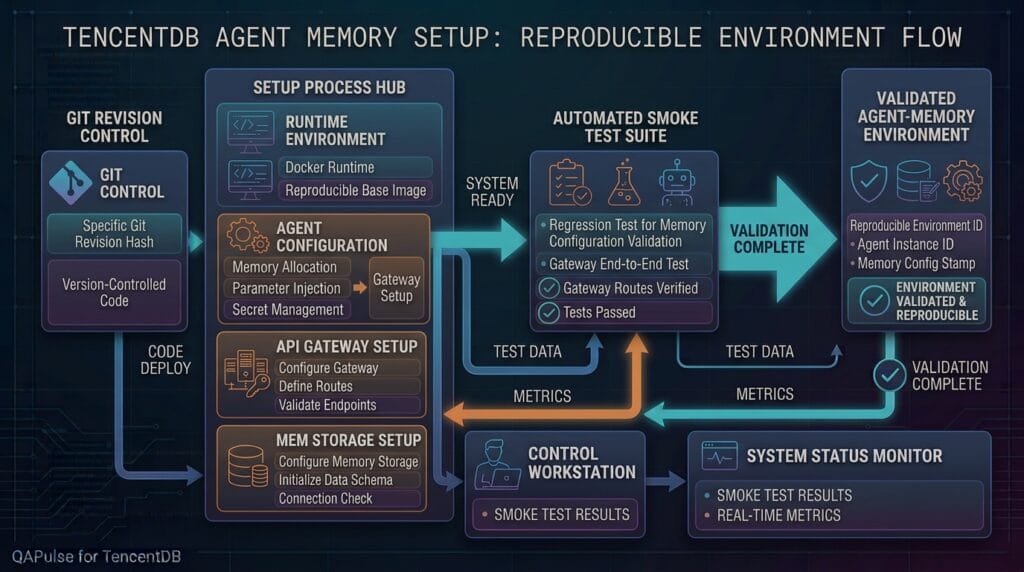
The strongest TencentDB Agent Memory Setup is not the one with the most services.
It is the one you can reproduce, inspect, test, and explain.
A practical validation model is:
                    Environment
                         │
          ┌──────────────┼──────────────┐
          ▼              ▼              ▼
       Runtime      Configuration    Repository
          │              │              │
          └──────────────┼──────────────┘
                         ▼
                      Gateway
                         │
                         ▼
                       Health
                         │
                         ▼
                  Memory Operations
                         │
              ┌──────────┴──────────┐
              ▼                     ▼
           Persist               Retrieve
              │                     │
              └──────────┬──────────┘
                         ▼
                  Agent Context
If you can verify each layer independently, troubleshooting becomes much more strategic.
You are no longer asking:
“Why doesn’t my Agent remember?”
You can ask:
“Did the conversation reach the memory layer?”
“Was the memory extracted?”
“Was it persisted?”
“Was the retrieval query relevant?”
“Did the Agent receive the returned context?”
Those are answerable engineering questions.
Internal Blog Links
- What Is TencentDB Agent Memory? A Practical Guide to AI Agent Memory
- TencentDB Agent Memory Architecture: How Persistent AI Memory Actually Works
- TencentDB Agent Memory Storage: How Short Term and Long Term Memories Are Stored
- TencentDB Memory Retrieval Design: How AI Agents Find the Right Context
- Building TencentDB Agent Memory Layers: L0 to L3 Explained
- TencentDB Agent Memory SDK: Build Persistent Memory Into Your AI Agent
- Graph Engineering: The Powerful Layer After Loop Engineering
- Graph Testing: The Critical QA Layer After Loop-Based Test Automation
- Agentic Test Creation vs AI Test Generation: What’s the Real Difference?
- AI Test Automation With Humans in the Loop: Governance, Metrics, and the Practical Guide
Internal Series Links
- Learn MCP – Zero to Hero
- Learn AI Agents for QA – Zero to Hero
- Playwright Automation – Zero to Hero
- TencentDB Agent Memory: Complete Zero to Hero
- LangGraph: Complete Zero to Hero
- Learn Python – Zero to Hero
- OpenAI Codex: Complete Zero to Hero
- Cursor AI: Complete Zero to Hero
- Claude Code Tutorial: Complete Zero to Hero
- AutoGen: Complete Zero to Hero Guide
- Free QA Resources Built From Real Experience
- QA Glossary: Test Automation Terms Every Engineer Should Know
External Links
- Official TencentDB Agent Memory repository: TencentDB Agent Memory GitHub repository
- Official Installation Guide: TencentDB Agent Memory installation guide
- Official Deployment Documentation: TencentDB Agent Memory deployment documentation
- Official Development Requirements: TencentDB Agent Memory contributing guide
AI Overview Optimization
What is TencentDB Agent Memory Setup?
TencentDB Agent Memory Setup is the process of preparing the runtime, dependencies, configuration, Gateway, storage, and deployment environment required to run and validate TencentDB Agent Memory for an AI Agent.
How do you set up TencentDB Agent Memory?
A practical setup follows these steps:
- Install the required Node.js environment.
- Clone or install the TencentDB Agent Memory project.
- Install dependencies.
- Configure the required LLM environment variables.
- Start the Gateway.
- Verify the Gateway health endpoint.
- Test memory persistence and retrieval.
The official project currently documents Node.js 22.16.0+ for development and provides standalone and service-oriented deployment approaches.
AEO Optimization
How do I configure TencentDB Agent Memory?
Configure the required runtime and dependencies, define the LLM credentials and endpoint, select the deployment mode, start the Gateway, and verify the /health endpoint before testing actual memory persistence.
What do I need before installing TencentDB Agent Memory?
For development from source, the current project documentation lists Node.js 22.16.0 or newer and npm or pnpm. The exact requirements can vary by integration and release.
How do I check whether TencentDB Agent Memory is working?
Start the Gateway and call its health endpoint:
curl http://127.0.0.1:8420/healthA successful health response confirms that the Gateway is responding, but a separate persistence and retrieval test is required to prove that Agent memory actually works.
Does TencentDB Agent Memory require Docker?
No. The project documents standalone deployment as well as Docker and broader service-oriented deployment options. Standalone deployment is suitable for local development and simpler environments, while service deployment is intended for larger distributed scenarios.
How do I test persistent Agent memory?
Write a known memory, restart the relevant process or service, then perform a retrieval operation and verify that the expected information is returned. This validates persistence rather than merely testing an in-memory read/write cycle.
What is the TencentDB Agent Memory Gateway?
The Gateway provides an HTTP-facing integration boundary through which an external Agent can communicate with the memory system. The project documentation describes standalone and service deployments using a shared Gateway/API model.
People Asked Questions
What is TencentDB Agent Memory Setup?
TencentDB Agent Memory Setup is the process of preparing the runtime, dependencies, configuration, Gateway, storage, and validation workflow required to run TencentDB Agent Memory for an AI Agent.
What do I need before setting up TencentDB Agent Memory?
For development from source, the current project documentation lists Node.js 22.16.0 or newer, with npm or pnpm used for dependency management. Additional requirements depend on the deployment mode and services being configured.
How do I start TencentDB Agent Memory?
For a standalone environment, configure the required LLM environment variables and start the Gateway from the MemoryCore project. The documented default Gateway address is 127.0.0.1:8420.
How do I check whether TencentDB Agent Memory is working?
Use the Gateway health endpoint:
curl http://127.0.0.1:8420/health
A successful response confirms that the Gateway is responding. However, a health check alone does not prove that memory persistence and retrieval are working correctly.
Does TencentDB Agent Memory require Docker?
No. The project supports standalone deployment as well as Docker-based and broader service-oriented deployment approaches. Standalone deployment is useful for local experimentation, while distributed deployments can support more complex environments.
How do I test persistent Agent memory?
Write a known piece of information into memory, restart the relevant process or service, and then perform a retrieval operation. If the expected information can still be retrieved, you have tested persistence rather than merely testing an in-memory operation.
What is the difference between standalone and service deployment?
Standalone deployment is designed for a simpler local environment and uses local storage components. Service deployment is designed for distributed scenarios and can integrate services such as Tencent Cloud Vector Database, COS, and Redis.
How should I protect API keys during setup?
Store credentials in environment variables or an appropriate secret-management system and never print the complete value in logs. For example:
if [[ -n "${TDAI_LLM_API_KEY:-}" ]]; then
  echo "API key configured"
else
  echo "API key missing"
fi
This confirms that a credential exists without exposing the credential itself.
Why does a successful Gateway health check not guarantee that Agent memory works?
Because the health endpoint primarily establishes service availability. Actual Agent memory requires additional validation of memory capture, persistence, retrieval, relevance, and context delivery.
What is the best way to make a TencentDB Agent Memory environment reproducible?
Record the Node.js version, package-manager version, repository commit, deployment mode, Gateway configuration, storage configuration, and validation results. Then automate the critical checks with a smoke-test script so another developer or CI pipeline can reproduce the environment.
Conclusion
A production-minded TencentDB Agent Memory Setup should be treated as a testable system rather than a collection of installation commands.
Start with a deployment mode that matches your objective. Validate the Node.js runtime and dependencies. Protect configuration secrets. Verify the Gateway independently. Check health before testing memory. Then validate persistence and retrieval instead of assuming that a running HTTP service means the memory layer is functioning correctly.
For local experimentation, the standalone architecture provides a comparatively small surface area. When team memory, shared knowledge, Proxy-based Agent integration, or distributed deployment becomes necessary, the broader Core, Hub, and Proxy architecture provides the appropriate path. The official documentation should remain the authority for version-specific commands and configuration because the project is evolving rapidly. (GitHub)
Final Key Takeaways
- Validate the environment before debugging the Agent.
- Node.js 22.16+ is currently documented as a development prerequisite. (GitHub)
- A healthy Gateway does not automatically prove that memory persistence or retrieval works.
- Test memory across a restart when persistence is part of your requirement.
- Never expose LLM API keys while troubleshooting configuration.
- Use standalone deployment for focused local experimentation.
- Use the broader Core + Hub + Proxy architecture when team-level Agent memory requires it.
- Record the repository revision, runtime, deployment mode, and configuration used for successful validation.
- Turn environment checks into automated smoke tests whenever possible.
- Treat reproducibility as part of the engineering quality of your memory infrastructure.
Continue Learning
Explore more expert articles on Mobile Testing, Backend & API, AI & Agentic, AI Tools, n8n, LangChain, CrewAI, MCP Servers, AI Agents, LlamaIndex, Docker, FastAPI, Playwright, Cypress, Test Automation, DevOps, and Software Engineering at www.skakarh.com.
QAPulse by SK delivers expert release analysis, AI engineering insights, enterprise automation strategies, migration guidance, DevOps best practices, and practical testing knowledge to help software professionals build scalable, intelligent, and production-ready software systems.