 QA
QA
Why You Should Install OpenAI Codex
After understanding what Install OpenAI Codex offers and how it assists software development, the next step is setting up your development environment. A proper installation ensures you can collaborate with Codex directly from your computer, connect it to your projects, and begin using AI to automate coding tasks, explain complex codebases, generate tests, and improve productivity.
Unlike traditional IDE plugins that only provide code completion, OpenAI Codex can operate as a coding agent capable of working with repositories, terminals, and development workflows. Installing it correctly provides the foundation for everything covered throughout this series. (OpenAI)
What Is Required Before You Install OpenAI Codex?
Before starting the installation, verify that your development environment is ready.
Supported Operating Systems
You can install OpenAI Codex on:
- Windows
- macOS
- Linux
The installation experience is designed to be similar across all supported platforms. (npm)
Internet Connection
An active internet connection is required to:
- Download the installer
- Authenticate your account
- Access AI features
- Synchronize projects
Although some local operations are available, AI-powered functionality requires communication with OpenAI services.
OpenAI Account
To use most Codex features, you’ll need an OpenAI account.
After installation, you’ll typically sign in using your ChatGPT account or configure an API key, depending on your preferred workflow. (OpenAI)
Development Environment
While OpenAI Codex works independently, having a development environment already prepared makes onboarding easier.
Common tools include:
- Git
- Node.js
- Python
- Visual Studio Code
- Cursor
- Terminal or PowerShell
These tools are not mandatory for every workflow but are commonly used by software developers.
Installation Workflow
The installation process follows a straightforward sequence.
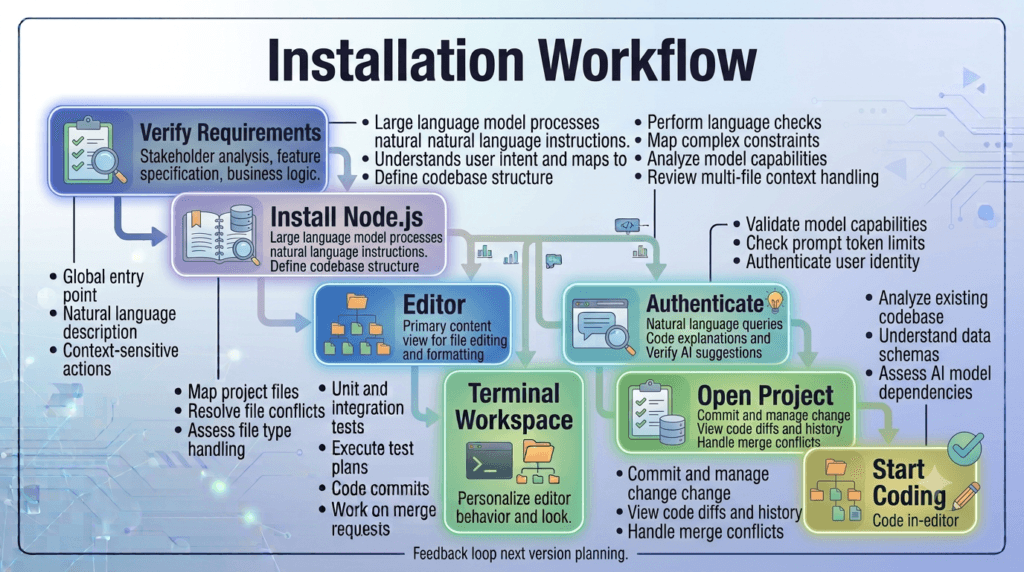
Verify Requirements

↓

Download OpenAI Codex

↓

Install Application

↓

Sign In

↓

Select Project

↓

Configure Workspace

↓

Start Coding
Each step prepares the environment for productive AI-assisted development. (OpenAI)
Choosing the Right Installation Method
OpenAI Codex provides multiple ways to get started depending on your workflow.
Desktop Application
The desktop application is suitable for developers who want a graphical interface for managing projects, conversations, and coding tasks.
It provides an intuitive experience for beginners while supporting advanced development workflows.
Command Line Interface
Developers who prefer terminal-based workflows can install the Codex CLI.
This approach is especially useful for:
- Automation
- DevOps
- Remote servers
- Continuous Integration
- Terminal-first development
The CLI integrates naturally with existing command-line workflows. (npm)
Understanding the Installation Process
Regardless of your operating system, the installation generally consists of four stages.
Download
Obtain the appropriate installer or package for your operating system from the official OpenAI resources.
Installation
Run the installer or package manager command and complete the setup process.
Authentication
Sign in using your ChatGPT account or configure API credentials if required.
Project Selection
Choose an existing project folder or create a new workspace where Codex can begin assisting with development tasks. (OpenAI)
How OpenAI Codex Connects to Your Projects
One of the strengths of Install OpenAI Codex is its ability to work directly with your source code.
Rather than generating isolated snippets, Codex can analyze project structure, understand repository context, and assist with real-world engineering tasks.
A typical project connection looks like this:
Project Folder

↓

Repository Analysis

↓

Context Understanding

↓

AI Assistance

↓

Code Generation

↓

Developer Review
This repository awareness allows Codex to produce more relevant suggestions than tools that only analyze the currently open file.
Benefits of Installing OpenAI Codex
A properly configured installation enables developers to:
- Generate production-ready code
- Understand unfamiliar repositories
- Review existing implementations
- Refactor applications
- Create automated tests
- Explain complex algorithms
- Improve documentation
- Accelerate software development workflows
These capabilities make OpenAI Codex valuable for both individual developers and engineering teams.
Common Installation Mistakes
New users often encounter avoidable issues during setup.
Typical mistakes include:
Skipping System Requirements
Always verify that your operating system and development tools meet the recommended requirements before installation.
Using Unofficial Installation Sources
Download installers and packages only from official OpenAI resources to ensure security and receive the latest updates. (OpenAI)
Opening Individual Files
After installation, open the complete project folder instead of isolated files so Codex can understand the repository structure.
Ignoring Authentication
Many AI-powered capabilities require successful authentication. Complete the sign-in process before starting development.
Preparing for Configuration
Installing OpenAI Codex is only the first stage of building an AI-powered development environment. After the software is installed, the next step is configuring your workspace, connecting projects, and customizing the environment to match your development workflow.
Install OpenAI Codex: Step-by-Step Installation on Windows, macOS, and Linux
Installing OpenAI Codex on Windows
Windows is one of the most widely used operating systems for software development. Whether you’re building web applications, desktop software, automation frameworks, or AI-powered solutions, the installation process is straightforward when you follow the correct steps.
Before beginning, ensure you have:
- A stable internet connection
- An OpenAI account
- Administrator access (if required)
- Git installed
- Node.js installed
- A supported terminal such as PowerShell or Windows Terminal
Keeping your development tools updated helps avoid compatibility issues during installation.
Step 1: Verify Node.js Installation
Open a terminal and check whether Node.js is installed.
node --version
Verify npm as well.
npm --version
If these commands return version numbers, your environment is ready.
Installing the OpenAI Codex CLI
The easiest way to Install OpenAI Codex is through npm.
Run the following command:
npm install -g @openai/codex
The package manager downloads the latest version and installs the Codex CLI globally.
After installation completes, verify it successfully installed.
codex --version
If a version number appears, the installation was successful.
Installing OpenAI Codex on macOS
The installation process on macOS is almost identical.
First verify Node.js.
node --version
Then install Codex.
npm install -g @openai/codex
Finally verify the installation.
codex --version
Developers using Apple Silicon and Intel-based Macs follow the same installation workflow.
Installing OpenAI Codex on Linux
Linux developers can also install OpenAI Codex using npm.
Verify Node.js.
node --version
Install the CLI.
npm install -g @openai/codex
Verify installation.
codex --version
The installation process works across most modern Linux distributions including Ubuntu, Debian, Fedora, Arch Linux, and similar environments.
Installation Workflow
The overall process remains consistent across all operating systems.
Install Node.js

↓

Verify npm

↓

Install OpenAI Codex

↓

Verify Installation

↓

Authenticate

↓

Open Project
Keeping the workflow identical across platforms simplifies onboarding for development teams.
Authenticating OpenAI Codex
After successfully installing the CLI, authentication is required before AI features become available.
Open your terminal and run:
codex login
Follow the browser-based authentication process using your OpenAI account.
Depending on your account type and workflow, you may also configure API credentials for development environments that require API-based authentication.
Successful authentication allows OpenAI Codex to communicate securely with OpenAI services.
Confirming Everything Works
Once authenticated, execute a simple command.
codex
If the interactive interface launches without errors, the installation is complete.
You should now be able to:
- Start new coding sessions
- Analyze repositories
- Generate code
- Ask programming questions
- Explain existing code
- Review implementations
Updating OpenAI Codex
OpenAI continuously improves Codex with new capabilities and bug fixes.
To update to the latest version, run:
npm update -g @openai/codex
Regular updates ensure access to the latest features, security improvements, and performance enhancements.
Uninstalling OpenAI Codex
If you need to remove the CLI from your system, execute:
npm uninstall -g @openai/codex
You can reinstall it later using the standard installation command whenever needed.
Troubleshooting Installation Problems
Although installation is usually straightforward, developers occasionally encounter issues.
Node.js Not Found
If the terminal reports that the node command cannot be found:
- Verify Node.js is installed.
- Restart the terminal.
- Confirm Node.js has been added to the system PATH.
npm Permission Errors
Permission-related errors usually occur when installing global packages.
Possible solutions include:
- Running the terminal with appropriate permissions.
- Configuring npm’s global package directory.
- Using a Node version manager appropriate for your operating system.
Command Not Recognized
If codex is not recognized after installation:
- Restart the terminal.
- Verify the global npm binary directory is included in your PATH.
- Reinstall the package if necessary.
Authentication Issues
If authentication fails:
- Verify your internet connection.
- Ensure you’re signing in with the correct OpenAI account.
- Complete the browser authentication process without interruption.
Installation Checklist
Before moving to the next stage, confirm the following:
- Node.js is installed.
- npm is working correctly.
- OpenAI Codex CLI is installed.
- The installed version is verified.
- Authentication completed successfully.
- The
codexcommand launches correctly. - Your development environment is ready for project configuration.
A properly installed environment provides the foundation for configuring OpenAI Codex, connecting repositories, and integrating AI into your daily software development workflow.
Install OpenAI Codex: Configuring Your Development Environment After Installation
Why Configuration Is Important
Successfully completing Install OpenAI Codex is only the first step. A properly configured development environment allows Codex to understand your projects, communicate with development tools, and provide accurate, context-aware assistance.
Many developers install the CLI and immediately start asking questions without configuring their workspace. While basic functionality may work, advanced capabilities become much more effective when your environment is organized correctly.
A few minutes spent configuring your setup can significantly improve your daily development experience.
Opening Your First Project
After installation, navigate to your project directory.
cd my-project
Launch OpenAI Codex from the project’s root folder.
codex
Opening the root directory instead of an individual file allows Codex to understand the complete repository structure.
A typical workflow looks like this:
Open Project Folder

↓

Launch OpenAI Codex

↓

Analyze Repository

↓

Load Context

↓

Begin Development
Repository awareness is one of the biggest advantages of using OpenAI Codex for software development.
Connecting to an Existing Repository
Most developers work on existing projects rather than starting from scratch.
When working with an established repository, ensure the project contains the essential files and folders.
Example structure:
project/

├── src/
├── tests/
├── docs/
├── package.json
├── README.md
├── .gitignore
└── .env.example
Well-organized repositories enable OpenAI Codex to understand relationships between files more effectively.
Verifying Git Integration
Version control is a critical part of modern software engineering.
Before starting development, confirm that Git is initialized.
git status
If the repository is already configured, Git will display the current branch and file status.
Using OpenAI Codex alongside Git enables a smoother workflow for reviewing changes, creating commits, and managing feature branches.
Understanding Repository Context
One of the strengths of Install OpenAI Codex is its ability to work with repository context rather than isolated code snippets.
Instead of examining only the current file, Codex can understand:
- Folder structure
- Related modules
- Function relationships
- Existing coding patterns
- Project architecture
- Documentation
- Configuration files
This context allows it to generate suggestions that better match your project’s conventions.
Organizing Your Workspace
A clean workspace improves both developer productivity and AI performance.
Recommended layout:
Explorer

↓

Source Files

↓

Terminal

↓

Documentation

↓

Git

↓

OpenAI Codex Session
Keeping related resources organized minimizes unnecessary navigation and improves focus.
Configuring Environment Variables
Many projects depend on environment variables.
Store sensitive configuration in a dedicated environment file.
Example:
API_KEY=your_api_key
DATABASE_URL=your_database_url
PORT=3000
Never commit sensitive credentials to version control.
Instead:
- Add environment files to
.gitignore. - Share template files such as
.env.example. - Store production secrets securely.
Following these practices protects your application and development environment.
Running Your Project
Before asking OpenAI Codex to generate new code, verify that the existing project runs successfully.
Typical commands include:
npm install
npm run dev
or
npm test
Running the project confirms that dependencies are installed correctly and provides a stable starting point for development.
Exploring the Codebase
Before implementing new features, spend time understanding the existing application.
Review:
- Folder organization
- Business logic
- API structure
- Database models
- Configuration files
- Automated tests
OpenAI Codex becomes significantly more useful when it has access to a well-understood repository.
Starting Your First Development Session
Once the environment is configured, begin with small, focused tasks.
Good starting examples include:
- Explain a function.
- Review a class.
- Generate unit tests.
- Improve documentation.
- Refactor a helper method.
- Suggest performance improvements.
Beginning with manageable tasks helps build confidence and allows you to understand how Codex responds to your project’s context.
Keeping Your Development Environment Updated
Development tools evolve rapidly.
Regularly update:
- OpenAI Codex
- Node.js
- npm
- Git
- Project dependencies
Keeping your environment current ensures compatibility, improves performance, and provides access to the latest AI capabilities.
Common Configuration Mistakes
Developers often experience avoidable problems after installation.
Opening Individual Files
Always launch OpenAI Codex from the project’s root directory rather than a single source file.
Working Without Git
Repositories managed with Git provide better collaboration and simplify tracking AI-assisted changes.
Ignoring Project Documentation
Review the project’s README and setup instructions before requesting code generation.
Mixing Experimental and Production Code
Use separate branches for experimentation and AI-generated changes before merging them into production.
Configuration Checklist
Before beginning regular development, verify the following:
- OpenAI Codex is installed successfully.
- Authentication is complete.
- The project opens from the root directory.
- Git is configured correctly.
- Dependencies are installed.
- Environment variables are configured.
- The application builds successfully.
- Existing tests execute without errors.
Completing this checklist ensures that your development environment is fully prepared for productive AI-assisted software engineering using OpenAI Codex.
Install OpenAI Codex: Best Practices, Common Installation Issues, and Professional Setup Tips
Building a Reliable Development Environment
Completing the Install OpenAI Codex process is only the beginning. A stable development environment reduces troubleshooting, improves AI accuracy, and allows you to focus on building software instead of fixing configuration problems.
Professional developers rarely use a default setup. They organize their development environment so that every project follows consistent standards. This makes switching between repositories easier and ensures OpenAI Codex has access to a clean, well-structured workspace.
Best Practices After You Install OpenAI Codex
Keep OpenAI Codex Updated
OpenAI regularly releases improvements, bug fixes, and new capabilities.
Check for updates periodically to ensure you’re using the latest version.
Benefits include:
- Better AI responses
- Improved performance
- Security updates
- New developer features
- Compatibility with newer dependencies
An outdated installation may miss important functionality introduced in recent releases.
Organize Your Projects
A well-organized repository improves both developer productivity and AI understanding.
A recommended project structure is:
project/

├── src/
├── tests/
├── docs/
├── config/
├── scripts/
├── assets/
├── package.json
├── README.md
└── .gitignore
Consistent project organization helps OpenAI Codex understand the repository more effectively and generate code that aligns with your application’s architecture.
Keep Documentation Updated
Many developers overlook documentation until the end of a project.
Maintain files such as:
- README.md
- Installation guides
- API documentation
- Architecture diagrams
- Environment setup instructions
Accurate documentation provides additional context that OpenAI Codex can use while assisting with development.
Use Version Control from the Beginning
Initialize Git before making significant changes.
A recommended workflow is:
Create Branch

↓

Develop Feature

↓

Review Changes

↓

Run Tests

↓

Commit

↓

Push Branch

↓

Create Pull Request
Version control makes it easier to track AI-assisted changes and collaborate with other developers.
Common Problems After Installing OpenAI Codex
Although the installation process is usually straightforward, some issues may occur during initial setup.
OpenAI Codex Command Not Found
Possible causes include:
- Installation did not complete successfully.
- Global npm packages are not available in the system PATH.
- Terminal session needs to be restarted.
Verify the installation by running:
codex --version
If the version number appears, the CLI has been installed correctly.
Authentication Problems
Authentication errors can occur if:
- Internet connectivity is unavailable.
- Incorrect account credentials are used.
- Browser authorization is interrupted.
- Firewall or proxy settings block authentication.
Complete the authentication process before attempting to use AI-powered features.
Repository Not Detected Correctly
Always launch OpenAI Codex from the project’s root directory.
Incorrect:
project/src/controllers
Correct:
project/
Opening the entire repository enables OpenAI Codex to understand project context instead of a single file.
Dependency Errors
Missing dependencies may prevent the project from running correctly.
Common commands include:
npm install
or
pip install -r requirements.txt
Ensure all required packages are installed before requesting AI-generated changes.
Security Best Practices
Security should always be part of your development workflow.
Protect API Keys
Never hardcode:
- API keys
- Access tokens
- Database passwords
- Private credentials
Instead:
- Use environment variables.
- Store secrets securely.
- Exclude sensitive files from version control.
Review Generated Code
Although OpenAI Codex produces high-quality code, every implementation should be reviewed for:
- Security vulnerabilities
- Input validation
- Authentication
- Authorization
- Error handling
- Data protection
AI accelerates development but does not replace secure coding practices.
Performance Tips
To improve responsiveness while using Install OpenAI Codex, consider the following recommendations:
- Close unnecessary applications.
- Keep repositories organized.
- Remove unused dependencies.
- Archive obsolete projects.
- Update development tools regularly.
A clean environment generally results in a smoother development experience.
Team Setup Recommendations
When multiple developers use OpenAI Codex, establish shared development standards.
Recommended practices include:
- Standard project structure
- Common formatting rules
- Shared linting configuration
- Consistent naming conventions
- Branching strategy
- Documentation standards
Consistency helps OpenAI Codex generate code that aligns with the team’s development practices.
Daily Environment Checklist
Before beginning development, verify:
- OpenAI Codex is up to date.
- Authentication is active.
- The correct repository is open.
- Dependencies are installed.
- Environment variables are configured.
- Git is functioning correctly.
- Existing tests pass successfully.
- Documentation reflects the current project state.
Following the same checklist each day reduces setup problems and helps maintain a reliable development environment.
Professional Recommendations
To get the most value after you Install OpenAI Codex, focus on building disciplined development habits rather than relying solely on AI-generated code.
Professional developers consistently:
- Plan features before implementation.
- Work on small, focused tasks.
- Review every AI-generated change.
- Write automated tests.
- Commit changes frequently.
- Maintain clean documentation.
- Follow coding standards.
- Keep development tools updated.
These practices allow OpenAI Codex to become an effective engineering assistant while ensuring that software remains secure, maintainable, and production-ready.
Internal Links:
- Learn MCP – Zero to Hero
- Learn AI Agents for QA – Zero to Hero
- Playwright Automation – Zero to Hero
- Learn Python – Zero to Hero
- Cursor AI: Complete Zero to Hero
- Claude Code Tutorial: Complete Zero to Hero
- Free QA Resources Built From Real Experience
- QA Glossary: Test Automation Terms Every Engineer Should Know
External Resources:
- OpenAI Codex – Get Started: OpenAI Codex Get Started
- OpenAI Codex CLI – Getting Started: OpenAI Codex CLI Guide
- OpenAI Codex GitHub Repository: OpenAI Codex GitHub Repository
- Using OpenAI Codex with ChatGPT: Using Codex with ChatGPT
- OpenAI Codex CLI Authentication: Codex CLI Sign-in Guide
People Also Ask
How do I install OpenAI Codex?
To Install OpenAI Codex, install Node.js, install the Codex CLI using npm, authenticate with your OpenAI account, and launch the CLI from your project’s root directory.
Does OpenAI Codex work on Windows?
Yes. You can install OpenAI Codex on Windows using Node.js and npm. The installation process is similar to macOS and Linux.
Do I need Node.js to install OpenAI Codex?
Yes. The Codex CLI is distributed as an npm package, so Node.js and npm are required before installation.
Can I use OpenAI Codex with existing projects?
Yes. OpenAI Codex works with existing repositories and can understand project context when launched from the project’s root folder.
Is OpenAI Codex free to install?
The CLI can be installed without cost, but access to AI capabilities depends on your OpenAI account, subscription, or API usage, depending on the workflow you choose.
Featured Snippet
How to Install OpenAI Codex
To Install OpenAI Codex, first install Node.js and npm, then install the Codex CLI globally using npm. After installation, authenticate with your OpenAI account, open your project from its root directory, and begin using AI-assisted software development features.
AI Overview Answer
Install OpenAI Codex by preparing your development environment with Node.js, installing the official Codex CLI, authenticating your OpenAI account, and configuring your project workspace. Following the recommended setup process ensures better repository awareness, smoother AI interactions, and a more productive software development workflow.
Enjoyed this article? Explore more in-depth guides on AI engineering, automation testing, Model Context Protocol, Playwright, and intelligent software quality at www.skakarh.com. Follow QAPulse by SK for practical, production-focused tutorials designed for QA engineers, SDETs, and AI developers.