 QA
QA
AutoGen AI agent development starts with one simple idea: give an AI model a defined role, connect it to an appropriate model client, and provide it with a task it can execute.
You already have your Python environment and AutoGen setup ready. Now it is time to build your first working agent and understand what actually happens when that agent receives a task.
You do not need multiple agents, complex orchestration, tools, RAG, memory, or autonomous workflows yet.
Start with one agent.
The basic execution flow looks like this:
User Task
   ↓
AutoGen AI Agent
   ↓
Model Client
   ↓
AI Model
   ↓
Response
This simple workflow is the foundation for everything you will eventually build with AutoGen.
An AutoGen AI agent is more than an LLM generating text. The agent provides an application-level structure around the model, including its identity, instructions, model client, context, execution behavior, and optional tools.
The goal here is not simply to copy a working code example.
The goal is to understand exactly what happens between:
Task
  ↓
Agent
  ↓
Model
  ↓
Result
Once that mental model is clear, building more sophisticated AutoGen systems becomes much easier.
What Is an AI Agent in AutoGen?
An AI agent is not simply another name for an LLM.
An LLM generates responses.
An agent is an application-level component that uses a model and adds behavior around that model.
In AutoGen AgentChat, the AssistantAgent is a built-in agent designed to work with a model client and can also use tools. The official documentation describes it as a general-purpose preset intended particularly for prototyping and educational use. (microsoft.github.io)
Conceptually:
LLM
│
└── Generates language
while:
AssistantAgent
│
├── Identity
├── Instructions
├── Model Client
├── Conversation Context
├── Optional Tools
└── Agent Execution
The model provides intelligence.
The agent provides an application-level structure around that intelligence.
That distinction is fundamental.
Your First Agent Architecture
Your first AutoGen agent can be understood through four major components:
1. Model
      ↓
2. Model Client
      ↓
3. AssistantAgent
      ↓
4. Task
The model is the underlying language model.
The model client is the interface AutoGen uses to communicate with the model provider.
The AssistantAgent uses that model client to perform an agent task.
The task is what you ask the agent to accomplish.
The relationship looks like this:
                    ┌──────────────────┐
                    │    AI Model      │
                    └────────┬─────────┘
                             │
                             ▼
                    ┌──────────────────┐
                    │   Model Client   │
                    └────────┬─────────┘
                             │
                             ▼
                    ┌──────────────────┐
                    │ AssistantAgent   │
                    └────────┬─────────┘
                             │
                             ▼
                    ┌──────────────────┐
                    │      Task        │
                    └────────┬─────────┘
                             │
                             ▼
                         Response
This architecture is small.
That is intentional.
The Model Client Is Important
One of the most common beginner mistakes is to think that:
AssistantAgent(...)
is itself the AI model.
It isn’t.
The agent needs a model client.
The current AutoGen documentation demonstrates AssistantAgent with model clients such as OpenAIChatCompletionClient. (microsoft.github.io)
Conceptually:
model_client = OpenAIChatCompletionClient(...)
creates the interface through which the application communicates with the selected model.
Then:
agent = AssistantAgent(
    name="assistant",
    model_client=model_client,
)
creates the agent using that model client.
So:
Model Client
     ↓
AssistantAgent
is one of the most important relationships to understand at this stage.
Your First AutoGen Agent
A minimal example looks like this:
import asyncio

from autogen_agentchat.agents import AssistantAgent
from autogen_ext.models.openai import OpenAIChatCompletionClient


async def main():
    model_client = OpenAIChatCompletionClient(
        model="gpt-4.1-nano"
    )

    agent = AssistantAgent(
        name="assistant",
        model_client=model_client,
        system_message="You are a helpful AI assistant.",
    )

    result = await agent.run(
        task="Explain what software testing is in three sentences."
    )

    print(result.messages[-1].content)

    await model_client.close()


if __name__ == "__main__":
    asyncio.run(main())
This follows the current AgentChat pattern shown in the official documentation: create a model client, pass it to AssistantAgent, run a task, and process the resulting messages. (microsoft.github.io)
The exact model name should always match a model supported by the provider and your account.
Breaking the Code Down
Let’s understand the code instead of simply copying it.
Import the Agent
from autogen_agentchat.agents import AssistantAgent
This imports the built-in AssistantAgent.
AutoGen AgentChat provides several preset agents, but AssistantAgent is the natural starting point for a first model-powered agent. (microsoft.github.io)
Import the Model Client
from autogen_ext.models.openai import OpenAIChatCompletionClient
This gives your application an AutoGen-compatible model client for OpenAI-compatible model access through the corresponding extension.
The important concept is not the provider name.
The important concept is:
Agent
  ↓
Model Client
  ↓
Model Provider
  ↓
Model
That separation allows AutoGen to work with different model integrations.
Create the Model Client
model_client = OpenAIChatCompletionClient(
    model="gpt-4.1-nano"
)
This creates the client.
Think of the client as the communication layer between your AutoGen agent and the model service.
It handles the model interaction rather than requiring your agent code to manually construct every model request.
The official AutoGen AgentChat documentation uses the same general pattern of constructing a model client and supplying it to an AssistantAgent. (microsoft.github.io)
Create the Agent
Now:
agent = AssistantAgent(
    name="assistant",
    model_client=model_client,
    system_message="You are a helpful AI assistant.",
)
Three things are immediately important.
Name
name="assistant"
The agent receives a name.
This becomes particularly important when multiple agents communicate because their messages need identifiable sources.
Today you have one agent.
Later you may have:
researcher
writer
reviewer
tester
developer
Names become part of the communication model.
Model Client
model_client=model_client
This tells the agent which model interface it should use.
Without the model client, the agent doesn’t have the model connection required for inference.
System Message
system_message="You are a helpful AI assistant."
The system message establishes the agent’s behavioral instructions.
You can make the role more specific:
system_message="""
You are a software testing assistant.
Explain technical concepts clearly.
Use practical examples.
Prioritize accuracy over unnecessary complexity.
"""
Now the agent has a more specific role.
System Message vs User Task
These two concepts should not be confused.
The system message defines the agent’s behavior.
The user task defines what you want it to do.
For example:
System Message:
You are a QA automation expert.

User Task:
Explain how Playwright handles browser contexts.
The system message establishes:
Who the agent is
How it should behave
What priorities it should follow
The task establishes:
What the agent needs to accomplish
This distinction becomes increasingly important as agents become more specialized.
Run the Agent
Now we execute a task:
result = await agent.run(
    task="Explain what software testing is in three sentences."
)
The task is passed to the agent.
The agent uses its model client.
The model produces a response.
AutoGen returns the result.
Conceptually:
Task
 ↓
AssistantAgent
 ↓
Model Client
 ↓
LLM
 ↓
Model Response
 ↓
Agent Result
The official AgentChat documentation states that an agent’s run() method accepts a task and returns a TaskResult. (microsoft.github.io)
Why async Appears Everywhere
You may have noticed:
async def main():
and:
result = await agent.run(...)
This is not accidental.
AI model calls involve external operations.
Your application may need to:
Send request
      ↓
Wait for model
      ↓
Receive response
Asynchronous programming allows the application to work with these operations without treating every external call as a blocking operation.
For the first agent, you don’t need to become an expert in Python concurrency.
Just understand the basic relationship:
async def
    ↓
defines asynchronous function

await
    ↓
waits for asynchronous operation
Extracting the Response
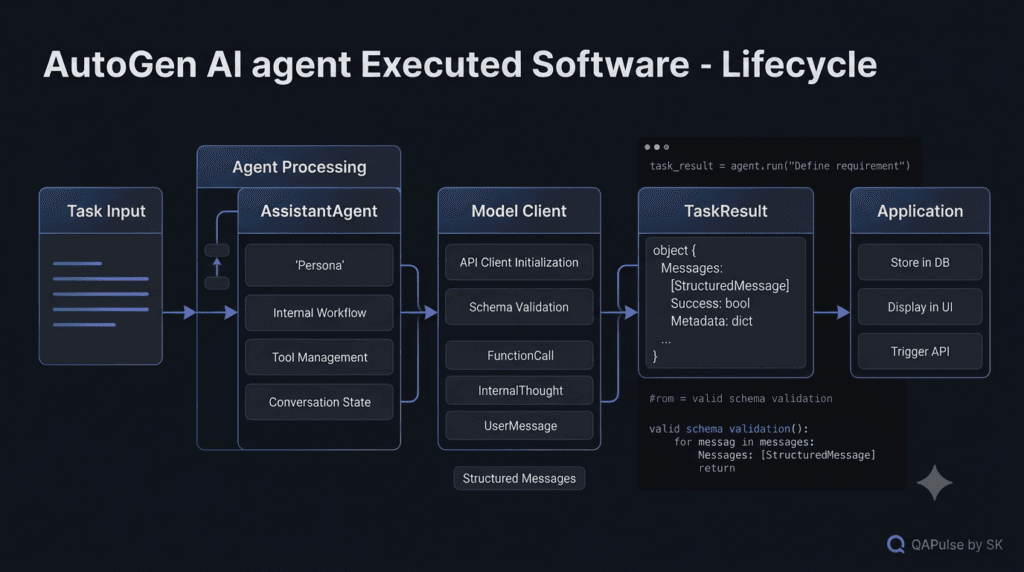
The result contains messages.
A simple example is:
print(result.messages[-1].content)
Here:
result.messages
represents the messages generated during the run.
And:
result.messages[-1]
gets the final message.
Then:
.content
gets its content.
This is important because AutoGen isn’t simply returning a raw string from every operation.
It uses structured message and result objects.
The AgentChat documentation defines message types and task results as part of its agent execution model. (microsoft.github.io)
A Better First Example for Engineers
Instead of asking the agent something completely generic, give it an engineering task.
result = await agent.run(
    task="""
    Explain the difference between unit testing,
    integration testing, and end-to-end testing.
    Give one practical example of each.
    """
)
This immediately makes the agent useful.
You can also provide a specialized system message:
agent = AssistantAgent(
    name="qa_assistant",
    model_client=model_client,
    system_message="""
    You are a senior QA automation engineer.
    Explain concepts using practical software testing examples.
    Keep answers technically accurate and concise.
    """,
)
Now you have:
Agent Identity
      +
Agent Instructions
      +
Model
      +
Task
That is already an AI agent application.
Your Agent Has a Role
The following:
system_message="You are a senior QA automation engineer."
is more than decoration.
It establishes an intended role.
Compare:
system_message="You are helpful."
with:
system_message="""
You are a senior SDET specializing in API testing.
Explain concepts using practical examples.
Identify assumptions.
Avoid inventing API behavior.
"""
The second provides a much stronger behavioral contract.
The model still generates the response.
But your application is providing explicit instructions about how that response should be generated.
Agent Behavior Is Not the Same as Guaranteed Behavior
This distinction matters.
If you write:
system_message="""
Always provide correct answers.
Never make mistakes.
"""
you have not mathematically guaranteed correctness.
You have given the model an instruction.
AI systems remain probabilistic.
Therefore:
Instruction
≠
Guarantee
This is one of the most important engineering lessons when building AI agents.
A production system eventually needs:
Instructions
+
Validation
+
Testing
+
Guardrails
+
Observability
But for your first agent, focus on understanding the basic execution model.
A More Structured First Agent
Let’s create a slightly better example:
import asyncio

from autogen_agentchat.agents import AssistantAgent
from autogen_ext.models.openai import OpenAIChatCompletionClient


async def main():
    model_client = OpenAIChatCompletionClient(
        model="gpt-4.1-nano"
    )

    qa_agent = AssistantAgent(
        name="qa_assistant",
        model_client=model_client,
        system_message="""
        You are a senior software testing assistant.

        Your responsibilities:
        - Explain testing concepts clearly.
        - Prefer practical examples.
        - Distinguish facts from assumptions.
        - Keep technical answers concise.
        """,
    )

    result = await qa_agent.run(
        task="""
        Explain the difference between API testing
        and end-to-end testing.
        """
    )

    print(result.messages[-1].content)

    await model_client.close()


if __name__ == "__main__":
    asyncio.run(main())
This is still a single-agent application.
But it demonstrates several important concepts:
Model Client
Agent Identity
Agent Role
System Instructions
Task
Execution
Result
Cleanup
That is a much stronger foundation than treating an agent as simply:
ask_llm("question")
Why Closing the Model Client Matters
Notice this line:
await model_client.close()
It is easy to ignore cleanup in small examples.
But resource lifecycle matters.
Your application may create connections, sessions, or other resources that should be closed when they are no longer needed.
The current AutoGen examples explicitly close the model client after use. (microsoft.github.io)
This becomes more important as your application grows.
What Actually Happened?
Let’s trace the entire execution.
You started with:
task = "Explain API testing."
Then:
Task
 ↓
AssistantAgent
The agent has:
Name
System Message
Model Client
The model client communicates with the model:
AssistantAgent
      ↓
Model Client
      ↓
AI Model
The model generates a response.
The result returns to your application:
AI Model
   ↓
Model Client
   ↓
AssistantAgent
   ↓
TaskResult
   ↓
Your Python Code
That is your first complete agent execution loop.
Agent vs Normal Function
A normal Python function might look like:
def calculate_total(price, tax):
    return price + tax
The behavior is deterministic.
Given the same inputs and assumptions, you expect the same logic to execute.
An AI agent is different:
result = await agent.run(
    task="Explain why this test might be flaky."
)
The model determines the response.
This introduces:
Non-deterministic output
Natural-language reasoning
Context dependence
Model limitations
Potential hallucinations
Therefore, AI agents require a different testing mindset.
Agent vs Chatbot
A chatbot might simply implement:
User
 ↓
LLM
 ↓
Response
An agent can be represented as:
User
 ↓
Agent
 ├── Instructions
 ├── Model
 ├── Context
 ├── Tools
 └── Execution Logic
 ↓
Response
The distinction becomes more obvious once tools and multi-agent workflows are introduced.
For now, however, your first AssistantAgent can behave like a sophisticated conversational assistant.
The important thing is understanding the architecture underneath it.
Agent State Matters
The official AutoGen documentation describes AgentChat agents as stateful. The agent maintains state between calls, and callers should pass only the new messages or task rather than repeatedly supplying the entire conversation history. (microsoft.github.io)
This means you should not automatically think of:
agent.run(...)
as a completely isolated function call.
The agent can maintain conversational context.
Conceptually:
First interaction
      ↓
Agent state

Second interaction
      ↓
Existing agent state
      +
New message
That becomes important when you build longer-running workflows.
One Agent Can Still Be Useful
There is a tendency to assume that AI agents become interesting only when there are multiple agents.
That’s incorrect.
A single agent can already be useful for:
Test case generation
API documentation analysis
Bug explanation
Requirement analysis
Code review assistance
Test-data generation
Technical documentation
Log analysis
For example:
result = await qa_agent.run(
    task="""
    Generate five boundary-value test cases
    for a user registration form that accepts
    usernames between 5 and 20 characters.
    """
)
The application now has a specialized testing assistant.
You have not yet added:
Tools
RAG
Memory systems
Multiple agents
Human approval
Code execution
And that’s okay.
The first objective is to understand the smallest useful unit.
Why Start With One Agent?
Because complexity compounds.
Consider:
One Agent
You need to understand:
Model
Agent
Task
Response
Now add another:
Agent A ↔ Agent B
You introduce:
Message routing
Roles
Coordination
Termination
Context
Add tools:
Agent
 ↓
Tool
 ↓
External System
Now you introduce:
Tool schemas
Arguments
Execution
Errors
Permissions
Add ten agents and the system becomes considerably more complicated.
Learning one agent first gives you a mental model for everything that follows.
A Useful Mental Model
Think of your first AutoGen agent as a software component:
┌─────────────────────────────┐
│       AssistantAgent        │
│                             │
│  Identity                   │
│  Instructions               │
│  Model Client               │
│  Context                    │
│  Execution                  │
└──────────────┬──────────────┘
               │
               ▼
          AI Model
The agent is the application-level component.
The model is the intelligence provider.
The task is the input.
The result is the output.
Once you understand this model, the rest of AutoGen becomes easier to reason about.
A Practical First-Agent Pattern
For small experiments, this pattern is a good starting point:
async def main():
    model_client = create_model_client()

    agent = AssistantAgent(
        name="assistant",
        model_client=model_client,
        system_message="Define the agent's role.",
    )

    result = await agent.run(
        task="Give the agent something useful to do."
    )

    print(result.messages[-1].content)

    await model_client.close()
The exact model client changes depending on the provider.
The structure remains conceptually similar:
Create client
      ↓
Create agent
      ↓
Define role
      ↓
Send task
      ↓
Read result
      ↓
Clean up
This is the basic pattern you should internalize.
Keep Your First Agent Small
Your first agent does not need:
50-line system prompt
10 tools
RAG
Memory database
Multiple models
Complex orchestration
Start with:
One model
One agent
One role
One task
One result
Then add complexity deliberately.
This makes experimentation easier and debugging much faster.
A First-Agent Experiment
Try changing only the system message.
Version one:
system_message="You are a helpful assistant."
Version two:
system_message="""
You are a senior SDET.
Explain software testing using practical examples.
Prioritize accuracy and clarity.
"""
Use the same task:
task="""
Explain the difference between regression testing
and retesting.
"""
Now compare the responses.
You are observing one of the fundamental ideas behind agent design:
Same Model
+
Different Instructions
=
Different Agent Behavior
This does not mean the model itself changed.
Your application changed the behavioral instructions given to the model.
The First Agent Is Your Baseline
Once this application works:
Python
  ↓
Model Client
  ↓
AssistantAgent
  ↓
Task
  ↓
Response
save it.
This becomes your baseline implementation.
Why?
Because future features can be compared against it.
If you later add:
Tools
and something breaks, you can compare with the baseline.
If you add:
Memory
and behavior changes unexpectedly, the baseline gives you a reference point.
If you introduce:
Multiple Agents
you still understand the original single-agent execution model.
A minimal working baseline is one of the most useful assets in AI engineering.
What You Should Understand Before Moving Forward
At this point, the important thing is not memorizing every parameter of AssistantAgent.
You should be able to explain:
What is an agent?
What is the model client?
Why does the agent need a model client?
What does the system message do?
What is the task?
What does run() return?
Why is async used?
Why should the model client be closed?
If you can explain those concepts, you understand the foundation of your first AutoGen agent.
The official AgentChat documentation describes AssistantAgent as a built-in agent that uses a language model and can use tools. Its run() method produces a TaskResult, while run_stream() can provide streamed events and messages. (microsoft.github.io)
That gives you the essential foundation:
Model
+
Model Client
+
AssistantAgent
+
Task
=
First AutoGen Agent
And that is where agent engineering really begins.
How an AutoGen AI Agent Actually Works
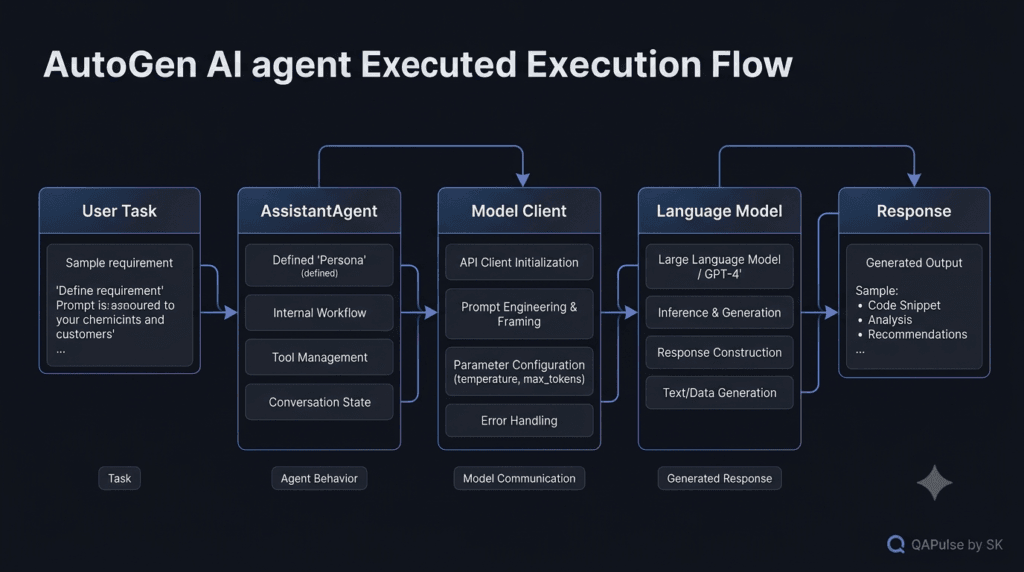
An AutoGen AI agent becomes easier to understand when you stop thinking of it as a single API call and instead look at the components working together.
A simple architecture contains four important layers:
User Task
    ↓
AssistantAgent
    ↓
Model Client
    ↓
Language Model
    ↓
Response
Each layer has a different responsibility.
The task defines the work.
The agent defines the behavior.
The model client provides the connection to the model.
The language model generates the response.
This separation is important because it gives your application clear boundaries.
The Agent Is Not the Model
One of the most important concepts to understand is that an agent and an LLM are not the same thing.
Consider a basic model interaction:
Prompt
  ↓
LLM
  ↓
Text Response
The model receives an instruction and generates an output.
An agent introduces another layer:
Task
  ↓
Agent
  ├── Instructions
  ├── Identity
  ├── Model Client
  ├── Context
  └── Optional Tools
        ↓
      Model
        ↓
     Response
This distinction becomes extremely important once the application grows.
A model is primarily responsible for generating model output.
An agent is responsible for participating in an application workflow.
Agent vs LLM
| Capability | LLM | AutoGen AI Agent |
|---|---|---|
| Generates language | Yes | Through the model |
| Has an application identity | No | Yes |
| Receives agent instructions | Limited to prompts | Yes |
| Maintains agent state | Not inherently | Yes |
| Can participate in workflows | Limited | Yes |
| Can use tools | Provider/API dependent | Yes, when configured |
| Can communicate with other agents | Not inherently | Yes |
| Can be orchestrated | External application required | Designed for agent workflows |
The distinction is simple:
The model provides intelligence; the agent provides structure and behavior around that intelligence.
That mental model will save you from many architectural mistakes later.
Understanding AssistantAgent
The AssistantAgent is one of the most useful starting points in AutoGen AgentChat.
A basic implementation looks like this:
from autogen_agentchat.agents import AssistantAgent

agent = AssistantAgent(
    name="qa_assistant",
    model_client=model_client,
    system_message="""
    You are a senior software testing assistant.
    Explain concepts clearly and use practical examples.
    """
)
There are three important pieces here.
Agent Identity
name="qa_assistant"
The name identifies the agent.
That might seem unnecessary when you have only one agent.
It becomes important when you have:
researcher
developer
tester
reviewer
writer
Each agent needs a recognizable identity.
Model Client
model_client=model_client
The model client tells the agent how it should communicate with the selected model.
Conceptually:
AssistantAgent
      ↓
Model Client
      ↓
Model Provider
      ↓
Language Model
This separation means your application does not need to tightly couple the agent itself to every model API.
System Message
system_message="""
You are a senior software testing assistant.
"""
This establishes the intended role and behavior.
A useful system message should be specific enough to guide behavior without becoming an enormous collection of contradictory instructions.
System Instructions Are Behavioral Contracts
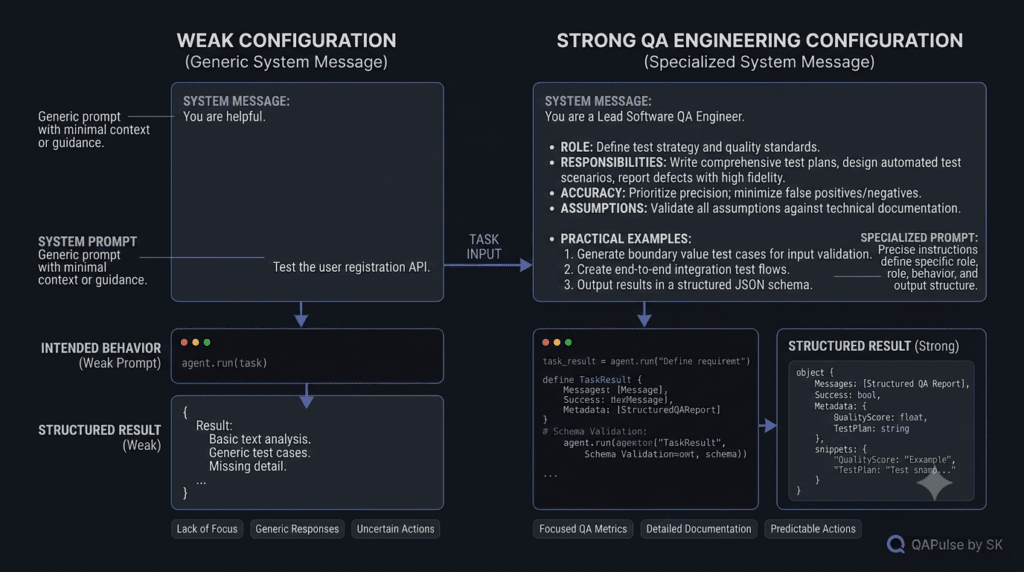
Compare these two configurations.
Weak instruction
system_message="You are helpful."
More useful instruction
system_message="""
You are a senior SDET specializing in API testing.

Your responsibilities:
- Explain technical concepts clearly.
- Provide practical testing examples.
- Identify assumptions.
- Avoid inventing API behavior.
- Prefer concise, technically accurate answers.
"""
The second instruction gives the model a much clearer behavioral direction.
But there is an important engineering principle:
Instruction
≠
Guarantee
A system message can influence model behavior.
It does not guarantee that every response will be correct.
For reliable applications, instructions eventually need to be combined with:
Validation
Testing
Guardrails
Observability
Error handling
Human review
That distinction is especially important for QA engineers building AI-powered testing systems.
Give the Agent a Real Task
A first experiment should use a task that produces something useful.
For example:
result = await agent.run(
    task="""
    Explain the difference between regression testing
    and retesting.

    Provide:
    1. A definition of each.
    2. One practical example.
    3. The key difference.
    """
)
The task is now structured.
Instead of:
Tell me about testing.
you have explicitly defined the expected content.
The agent receives the task and uses its configured model client to generate the response.
Conceptually:
Task
 ↓
Agent Instructions
 ↓
Model Client
 ↓
Language Model
 ↓
Generated Messages
 ↓
TaskResult
Understanding run()
The run() method is where your agent actually executes a task.
result = await agent.run(
    task="Explain API testing."
)
The operation is asynchronous, which is why you use:
await
The result is not simply something you should assume is a plain string.
You can inspect the returned messages:
for message in result.messages:
    print(message)
Or retrieve the final message:
print(result.messages[-1].content)
This is an important difference between building a traditional function and building an agent-based application.
Your code is dealing with structured agent execution results.
Inspect Before You Simplify
During development, don’t immediately reduce everything to:
print(result.messages[-1].content)
Instead, inspect what AutoGen actually returns.
For example:
result = await agent.run(
    task="Explain API testing."
)

print(type(result))
print(result.messages)

for message in result.messages:
    print("SOURCE:", message.source)
    print("CONTENT:", message.content)
This gives you visibility into the execution.
That habit is valuable.
When an AI workflow becomes complicated, developers often waste time guessing what happened.
A better approach is:
Execute
 ↓
Inspect
 ↓
Understand
 ↓
Validate
 ↓
Improve
That is exactly the mindset you want when engineering AI systems.
Why Async Matters
You may wonder why the first example uses:
async def main():
instead of:
def main():
AI applications frequently communicate with external services.
A simplified model interaction looks like:
Python Application
       ↓
Network Request
       ↓
Model Provider
       ↓
Model Processing
       ↓
Network Response
       ↓
Python Application
Your application has to wait for that operation.
Python’s asynchronous programming model allows these operations to be handled without treating every external operation as a traditional blocking workflow.
The basic syntax is:
async def main():
    result = await agent.run(
        task="Explain test automation."
    )
Think of the two keywords this way:
async
 ↓
This function can perform asynchronous operations.

await
 ↓
Wait for this asynchronous operation to complete.
You do not need to master advanced concurrency to build your first agent.
But you should understand why the pattern exists.
A Practical Single-Agent Example
Let’s combine the concepts into a small QA-focused application.
import asyncio

from autogen_agentchat.agents import AssistantAgent
from autogen_ext.models.openai import OpenAIChatCompletionClient


async def main():
    model_client = OpenAIChatCompletionClient(
        model="gpt-4.1-nano"
    )

    qa_agent = AssistantAgent(
        name="qa_assistant",
        model_client=model_client,
        system_message="""
        You are a senior SDET and software testing assistant.

        Explain testing concepts using practical examples.
        Be precise and concise.
        Clearly identify assumptions.
        Do not invent technical facts.
        """,
    )

    result = await qa_agent.run(
        task="""
        Create five boundary-value test cases
        for a username field that accepts
        between 5 and 20 characters.
        """
    )

    for message in result.messages:
        print(message.content)

    await model_client.close()


if __name__ == "__main__":
    asyncio.run(main())
This example is still intentionally small.
But it contains the essential pieces:
Model Client
      +
Agent Identity
      +
Behavioral Instructions
      +
Task
      +
Execution
      +
Result Handling
      +
Resource Cleanup
That is enough to build your first useful agent.
Why the QA Example Is Better Than a Generic Demo
A generic demonstration might ask:
Write a poem about a cat.
That proves the model can generate text.
It doesn’t teach much about engineering.
A QA-focused task:
Create five boundary-value test cases
for a username field that accepts
between 5 and 20 characters.
is different.
It gives you an opportunity to evaluate:
Correctness
Completeness
Boundary coverage
Instruction following
Output consistency
Those are engineering concerns.
This is why AI agent experiments should use realistic tasks whenever possible.
You are not merely testing whether the model can talk.
You are testing whether the agent can perform useful work.
Deterministic Software vs AI Agents
Traditional software usually follows explicit logic.
For example:
def validate_username(username):
    return 5 <= len(username) <= 20
The behavior is deterministic.
An AI agent is different:
result = await qa_agent.run(
    task="Generate username boundary test cases."
)
The model determines the generated response.
This creates a fundamental difference.
| Characteristic | Traditional Function | AI Agent |
|---|---|---|
| Logic | Explicit | Model-driven |
| Output | Usually predictable | Potentially variable |
| Validation | Often straightforward | Frequently required |
| Testing | Input/output assertions | Behavioral + quality evaluation |
| Dependencies | Code/runtime | Code + model + provider |
| Failure modes | Exceptions/logic bugs | Logic + model + context + provider |
| Reproducibility | Usually high | Can vary |
This is why testing AI agents requires more than checking whether the Python program completed without throwing an exception.
A successful execution does not necessarily mean a successful AI result.
The Most Important Testing Question
Suppose your agent returns:
Test case 1: Username length = 4
Test case 2: Username length = 5
Test case 3: Username length = 10
Test case 4: Username length = 20
Test case 5: Username length = 21
The Python program worked.
The model responded.
The request completed.
But what if the requirement was:
5 ≤ username length ≤ 20
Then the generated cases need to be evaluated.
You need to determine whether:
4  → Below minimum
5  → Minimum
10 → Valid middle
20 → Maximum
21 → Above maximum
The agent produced output.
Your engineering system still needs to determine whether that output is correct.
This is one of the most important ideas behind AI-driven testing:
Successful execution
≠
Correct result
Build a Baseline Before Adding Complexity
A common mistake is to jump directly from the first agent into a huge architecture.
For example:
Agent
 ↓
Tool
 ↓
RAG
 ↓
Memory
 ↓
MCP
 ↓
Five Agents
 ↓
Database
 ↓
Human Approval
That is difficult to debug.
Instead, establish a baseline:
One Model
   ↓
One Agent
   ↓
One Task
   ↓
One Result
Then change one thing at a time.
For example:
Baseline
 ↓
Add Tool
 ↓
Test
 ↓
Add Memory
 ↓
Test
 ↓
Add Second Agent
 ↓
Test
This is exactly the same principle used in good test automation architecture.
Small changes.
Clear boundaries.
Observable behavior.
Repeatable experiments.
A Useful Experiment Matrix
You can make your first agent experiments more systematic.
| Experiment | Change | What to Observe |
|---|---|---|
| 1 | Change task | Task interpretation |
| 2 | Change system message | Behavioral differences |
| 3 | Add structured instructions | Output consistency |
| 4 | Repeat the same task | Output variability |
| 5 | Add validation | Quality detection |
| 6 | Change model | Model behavior |
| 7 | Inspect messages | Execution structure |
This turns experimentation into engineering rather than random prompting.
Interactive Challenge: Improve the Agent
Start with:
system_message="You are a helpful assistant."
and this task:
Explain API testing.
Now redesign both.
Your objective is to create an agent that behaves like a senior API testing assistant.
Try something like:
system_message="""
You are a senior API testing engineer.

When answering:
1. Define the concept.
2. Give a practical API example.
3. Mention important edge cases.
4. Identify assumptions.
5. Avoid unsupported claims.
"""
Then compare the output with the original agent.
Ask yourself:
Did the role become clearer?

Did the response become more structured?

Did the examples become more practical?

Did the agent follow every instruction?

Which instructions were ignored?

What would you validate automatically?
This exercise teaches an important lesson:
Agent engineering is not just about writing the agent. It is also about evaluating its behavior.
A Better Engineering Pattern
As your agent grows, separate configuration from execution.
Instead of putting everything inside main(), you can create a factory function:
def create_qa_agent(model_client):
    return AssistantAgent(
        name="qa_assistant",
        model_client=model_client,
        system_message="""
        You are a senior SDET.
        Provide accurate and practical testing guidance.
        """
    )
Then:
async def main():
    model_client = OpenAIChatCompletionClient(
        model="gpt-4.1-nano"
    )

    agent = create_qa_agent(model_client)

    result = await agent.run(
        task="Explain contract testing."
    )

    print(result.messages[-1].content)

    await model_client.close()
This gives you a cleaner separation:
Configuration
      ↓
Agent Factory
      ↓
Agent Instance
      ↓
Execution
It also makes future testing easier.
You can create different agents using the same model client:
qa_agent = create_qa_agent(model_client)
and later:
developer_agent = create_developer_agent(model_client)
The architecture becomes easier to extend without turning the main application into one large function.
Keep Model Configuration Separate
You should also avoid scattering model configuration throughout your application.
Instead of:
agent = AssistantAgent(
    name="qa_assistant",
    model_client=OpenAIChatCompletionClient(
        model="gpt-4.1-nano"
    )
)
consider:
model_client = OpenAIChatCompletionClient(
    model="gpt-4.1-nano"
)

agent = AssistantAgent(
    name="qa_assistant",
    model_client=model_client
)
This small separation becomes valuable when you eventually need to change:
Model
Provider
Temperature/configuration
Timeouts
Authentication
Retry behavior
without rewriting agent definitions.
Think in Components, Not Magic
A beginner may see:
result = await agent.run(...)
and think:
AutoGen magically creates an answer.
A better engineering mental model is:
Your Application
       ↓
Agent Definition
       ↓
Model Client
       ↓
External Model
       ↓
Generated Messages
       ↓
Agent Result
       ↓
Your Application
Every arrow represents something that can succeed, fail, be observed, tested, or optimized.
That is how you should approach AI engineering.
Not as magic.
As a system.
Your First Agent as a Testable Component
Once the first agent works, you can begin treating it like any other software component.
For example, define an evaluation task:
evaluation_task = """
Generate five boundary-value test cases
for a field accepting values from 5 to 20.
"""
Run the agent:
result = await qa_agent.run(
    task=evaluation_task
)
Then inspect the output.
You can manually evaluate:
Does it include the minimum?

Does it include the maximum?

Does it test below the minimum?

Does it test above the maximum?

Are the expected results correct?
Later, these checks can become automated evaluation logic.
That transition—from manually inspecting AI output to systematically evaluating it—is one of the most important steps toward production AI engineering.
The Architecture You Should Remember
At this stage, keep the mental model simple:
                    ┌─────────────────┐
                    │    Your Task    │
                    └────────┬────────┘
                             ↓
                    ┌─────────────────┐
                    │ AssistantAgent  │
                    │                 │
                    │ Identity        │
                    │ Instructions    │
                    │ Context         │
                    └────────┬────────┘
                             ↓
                    ┌─────────────────┐
                    │  Model Client   │
                    └────────┬────────┘
                             ↓
                    ┌─────────────────┐
                    │  Language Model │
                    └────────┬────────┘
                             ↓
                    ┌─────────────────┐
                    │ Structured      │
                    │ Messages/Result │
                    └─────────────────┘
Everything you build later will extend this basic model.
Tools add another execution path.
Memory adds context.
RAG adds retrieval.
Multiple agents add communication.
Human-in-the-loop adds approval.
MCP adds external tool and context integrations.
But the basic agent remains the foundation.
The Engineering Strategy
The best strategy for learning AutoGen is not to memorize APIs.
Build a progressively more capable system.
Start here:
One Agent
Then evaluate:
Does it understand its role?
Does it follow instructions?
Does it produce useful output?
Can I inspect its result?
Can I test its behavior?
Only after those answers are clear should you increase complexity.
This gives you a controlled progression:
Single Agent
     ↓
Better Instructions
     ↓
Structured Tasks
     ↓
Validation
     ↓
Tools
     ↓
Memory
     ↓
Multiple Agents
     ↓
Orchestration
The important word is controlled.
AI applications can become complicated very quickly.
Good architecture keeps that complexity intentional.
Designing a More Reliable AutoGen AI Agent
Building an AutoGen AI agent that produces a response is relatively easy.
Building one that behaves consistently, can be inspected, tested, and maintained is a different engineering problem.
That distinction matters because the first successful execution can create a false sense of completion.
You might run:
result = await agent.run(
    task="Generate test cases for a login page."
)
and receive a useful response.
The application worked.
The model responded.
But several questions remain:
Was the response correct?
Was it complete?
Did it follow the instructions?
Did it invent information?
Would it behave similarly tomorrow?
Can another engineer understand what happened?
Can the output be automatically evaluated?
These questions move you from AI experimentation toward AI engineering.
Separate Agent Definition From Agent Execution
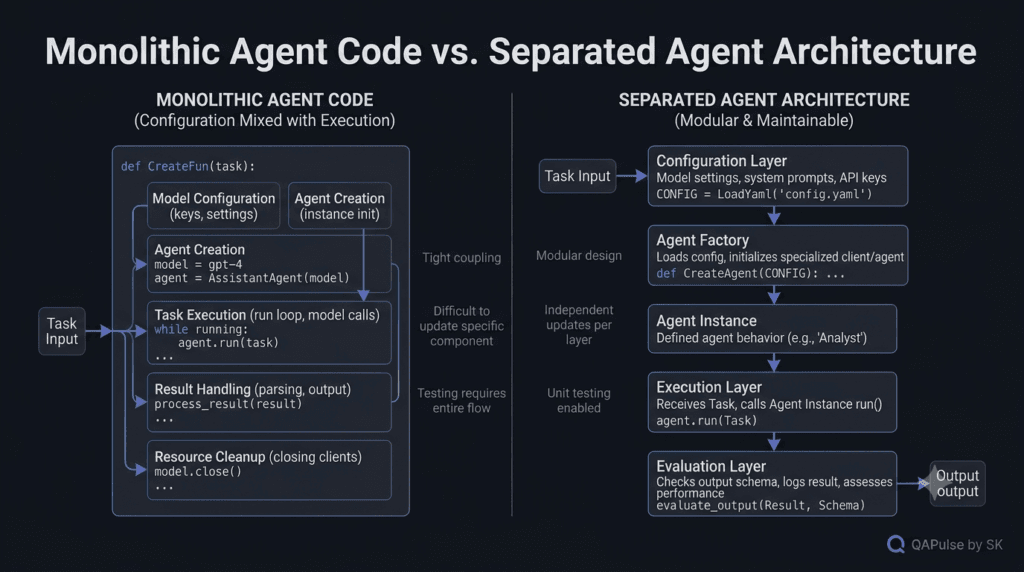
A clean implementation should separate the configuration of an agent from the code that executes it.
Instead of putting everything into one function:
async def main():
    model_client = OpenAIChatCompletionClient(
        model="gpt-4.1-nano"
    )

    agent = AssistantAgent(
        name="qa_assistant",
        model_client=model_client,
        system_message="You are a QA expert."
    )

    result = await agent.run(
        task="Explain API testing."
    )

    print(result.messages[-1].content)

    await model_client.close()
you can separate the responsibilities:
def create_qa_agent(model_client):
    return AssistantAgent(
        name="qa_assistant",
        model_client=model_client,
        system_message="""
        You are a senior QA automation engineer.

        Provide technically accurate answers.
        Use practical examples.
        Identify assumptions.
        Avoid unsupported claims.
        """
    )
Then execution becomes:
async def main():
    model_client = OpenAIChatCompletionClient(
        model="gpt-4.1-nano"
    )

    agent = create_qa_agent(model_client)

    result = await agent.run(
        task="Explain API contract testing."
    )

    print(result.messages[-1].content)

    await model_client.close()
This may look like a small refactoring.
It is actually an important architectural improvement.
Your agent definition now has one responsibility:
Define agent behavior
Your application entry point has another:
Create dependencies
Run workflow
Handle results
Clean resources
That separation becomes increasingly valuable as the application grows.
Configuration vs Execution
Think of the difference like this:
| Configuration | Execution |
|---|---|
| Agent name | Task |
| System instructions | run() |
| Model client | Result handling |
| Agent behavior | Error handling |
| Optional tools | Logging |
| Agent settings | Evaluation |
A common mistake is mixing both into one large function.
A better pattern is:
Configuration
      ↓
Agent Factory
      ↓
Agent Instance
      ↓
Execution
      ↓
Evaluation
This structure is easier to test and maintain.
Give Agents Specific Responsibilities
A generic agent can be useful:
system_message="You are a helpful assistant."
But specialized agents are easier to reason about.
For example:
system_message="""
You are a senior API testing engineer.

Your responsibilities:
- Analyze API requirements.
- Identify positive and negative scenarios.
- Identify boundary conditions.
- Suggest meaningful test cases.
- Explain assumptions.
"""
Now the agent has a defined responsibility.
The difference is subtle but important.
A generic assistant answers questions.
A specialized agent performs a defined role.
This distinction becomes critical when multiple agents eventually work together.
Imagine a future system with:
Requirement Analyst
        ↓
Test Designer
        ↓
Automation Engineer
        ↓
Test Reviewer
Each agent should have a clear responsibility.
If every agent is simply instructed:
"You are a helpful assistant."
you lose much of the architectural value of specialization.
Avoid Overloaded System Prompts
There is another mistake on the opposite side.
Developers sometimes create enormous system prompts containing dozens of rules:
system_message="""
You are an expert developer, tester, architect,
security engineer, product manager, project manager,
technical writer, researcher, DevOps engineer...

Always...
Never...
Unless...
Except when...
In cases where...
"""
The result can become difficult to understand and maintain.
A better approach is to define a focused responsibility.
For example:
system_message="""
You are a senior API testing engineer.

Focus on:
- API test design
- Negative scenarios
- Boundary conditions
- Contract validation

When requirements are ambiguous,
state the assumption before proposing tests.
"""
The principle is:
Focused Role
+
Clear Responsibilities
+
Explicit Constraints
rather than:
Huge Prompt
+
Every Possible Responsibility
Prompt Instructions vs Application Logic
Another important distinction is deciding what belongs inside the system message and what belongs in Python.
For example, you might tell the agent:
Always return exactly five test cases.
But if your application truly requires five items, you should not rely solely on an instruction.
You can validate the result:
if len(test_cases) != 5:
    raise ValueError("Expected exactly five test cases")
This creates a stronger architecture:
Agent Instruction
       +
Application Validation
The instruction guides the model.
The application enforces the requirement.
That distinction is fundamental to reliable AI applications.
AI Instructions Are Not Traditional Constraints
Consider this:
system_message="""
Always output valid JSON.
"""
You may receive valid JSON.
But you may also receive:
Here is the JSON you requested:

{
    "name": "login"
}
The response contains JSON, but the complete response is not necessarily valid JSON.
If your application requires machine-readable output, the system should enforce that requirement through appropriate structured-output mechanisms and validation rather than trusting natural-language instructions alone.
The general principle is:
Prompt
    ↓
Guidance

Schema
    ↓
Structure

Validation
    ↓
Enforcement
This distinction will become extremely important when building production agents.
Think About Failure Before Success
A beginner usually asks:
What happens when my agent works?
An engineer also asks:
What happens when it fails?
Consider:
result = await agent.run(
    task="Analyze this API requirement."
)
Potential failures include:
Network failure
Model provider failure
Authentication failure
Timeout
Rate limit
Invalid configuration
Unexpected model output
Missing context
Incorrect interpretation
Hallucination
Application exception
A reliable agent system needs to distinguish these failure types.
They are not all the same.
For example:
Authentication failure
is fundamentally different from:
Model produced an incorrect answer
The first is infrastructure/configuration.
The second is AI behavior.
Your troubleshooting strategy should reflect that difference.
Add Basic Error Handling
A simple application can start with:
try:
    result = await agent.run(
        task="Analyze the API requirement."
    )

    print(result.messages[-1].content)

except Exception as exc:
    print(f"Agent execution failed: {exc}")
This is not a complete production error-handling strategy.
It is a baseline.
In production, you would typically distinguish expected failures and add appropriate logging, retries, timeouts, monitoring, and recovery behavior.
But even basic exception handling is better than assuming every model request succeeds.
Don’t Hide the Original Task
When debugging an AI workflow, record what you actually asked the agent to do.
For example:
task = """
Generate negative test cases for an authentication API.
"""

try:
    result = await agent.run(task=task)

except Exception as exc:
    print("Task:", task)
    print("Error:", exc)
This is useful because the failure might not be caused by the agent configuration.
It might be caused by:
Ambiguous task
Missing information
Invalid assumptions
Unexpected input
Observability starts with knowing what was actually executed.
Build a Tiny Agent Evaluation Loop
Instead of manually testing your agent with random prompts, define a small set of evaluation tasks.
evaluation_tasks = [
    "Explain API testing.",
    "Generate three negative API test cases.",
    "Identify boundary conditions for a login form.",
    "Explain the difference between smoke and regression testing."
]
Then:
for task in evaluation_tasks:
    result = await agent.run(task=task)

    print("=" * 60)
    print("TASK:", task)
    print(result.messages[-1].content)
This creates a basic evaluation loop.
Now you can observe whether changes to the system message improve or worsen behavior.
For example:
Version A
    ↓
4 evaluation tasks
    ↓
Results

Version B
    ↓
Same 4 evaluation tasks
    ↓
Results
You now have a simple experiment framework.
Same Task, Different Agent
Create two agents:
generic_agent = AssistantAgent(
    name="generic_assistant",
    model_client=model_client,
    system_message="You are a helpful assistant."
)
and:
qa_agent = AssistantAgent(
    name="qa_assistant",
    model_client=model_client,
    system_message="""
    You are a senior QA automation engineer.
    Focus on practical testing strategies,
    edge cases, and technical accuracy.
    """
)
Use the same task:
task = """
Explain how to test a REST API endpoint
that creates a new customer.
"""
Then compare their outputs.
This is a simple but powerful experiment.
Comparison: Generic vs Specialized Agent
| Area | Generic Agent | Specialized Agent |
|---|---|---|
| Role | Broad | Specific |
| Instructions | General | Domain-focused |
| Output direction | Broad | Targeted |
| Testing | Harder to define expectations | Easier to evaluate |
| Multi-agent use | Less specialized | Better suited to a role |
| Maintenance | Simple initially | Clear responsibility |
| Risk | May wander across topics | Can become too narrowly scoped |
Neither is automatically better.
The correct design depends on the problem.
For a general assistant, broad behavior may be appropriate.
For an engineering workflow, specialized roles are often easier to control.
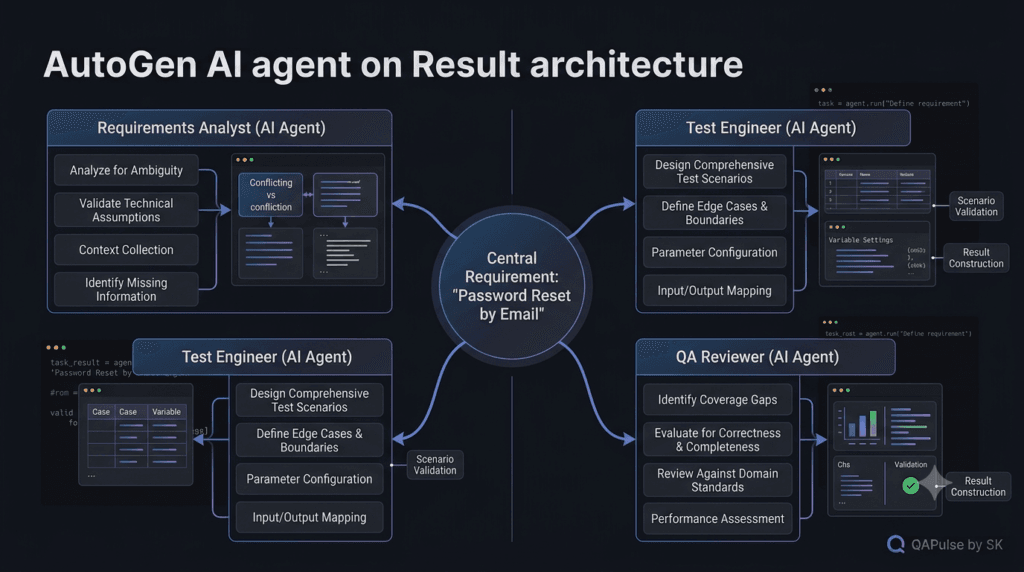
Interactive Experiment: Create Three Agent Personalities
Create three agents using the same model client.
Analyst
analyst = AssistantAgent(
    name="requirements_analyst",
    model_client=model_client,
    system_message="""
    You are a software requirements analyst.
    Identify ambiguity, assumptions, and missing requirements.
    """
)
Tester
tester = AssistantAgent(
    name="test_engineer",
    model_client=model_client,
    system_message="""
    You are a senior test engineer.
    Convert requirements into practical test scenarios.
    Focus on edge cases and negative testing.
    """
)
Reviewer
reviewer = AssistantAgent(
    name="test_reviewer",
    model_client=model_client,
    system_message="""
    You are a senior QA reviewer.
    Review proposed test scenarios for gaps,
    duplication, ambiguity, and missing coverage.
    """
)
Now give all three the same requirement:
The application allows users to reset their password
using an email address.
Ask:
What would each agent focus on?
You should expect different perspectives.
The analyst may identify missing requirements.
The tester may generate scenarios.
The reviewer may identify coverage gaps.
This exercise demonstrates why agent specialization matters.
When Should You Create Multiple Agents?
Not every problem needs multiple agents.
A single agent is usually simpler when:
One role
One task
Limited context
Few dependencies
Simple workflow
Multiple agents become more interesting when:
Different expertise is required
Tasks can be divided
Independent perspectives are valuable
Different tools are needed
A workflow contains distinct stages
Compare:
Simple task
     ↓
One Agent
with:
Complex workflow
     ↓
Analyst
     ↓
Developer
     ↓
Tester
     ↓
Reviewer
The second architecture can be powerful.
It can also be unnecessarily complicated.
That is why adding agents should be an architectural decision, not a trend-driven decision.
One Agent vs Multiple Agents
| Scenario | Recommended Starting Point |
|---|---|
| General question answering | One agent |
| Simple content generation | One agent |
| Test case generation | One specialized agent |
| Requirement analysis + test design | Potentially multiple agents |
| Code generation + code review | Multiple specialized roles can help |
| Research + verification | Multiple roles may be useful |
| Complex autonomous workflow | Multi-agent architecture may help |
The best system is not the one with the most agents.
It is the one with the least complexity required to reliably solve the problem.
The Role of Context
An agent’s response depends on more than its current task.
A simplified representation is:
Response
=
Model
+
Instructions
+
Task
+
Context
+
Available Tools
This explains why the same task can produce different behavior depending on what information the agent has available.
For example:
Task:
"Review this API."
is not enough if the agent has never received:
API specification
Authentication rules
Expected response schema
Business requirements
Error conditions
A capable model cannot reliably reason about information it does not have.
This leads to a critical engineering principle:
Better agents are not created only by better prompts. They are created by giving the right agent the right information at the right time.
Context Quality Matters
Imagine giving an agent this:
Build tests for the login API.
Now compare it with:
POST /api/login

Request:
{
  "email": "string",
  "password": "string"
}

Success:
200
{
  "token": "string"
}

Invalid credentials:
401

Account locked:
423
The second task contains substantially more context.
The model now has concrete information to reason about.
The quality of agent behavior depends heavily on the quality and relevance of the context supplied to it.
This principle becomes especially important when working with RAG, memory, tools, and multi-agent workflows.
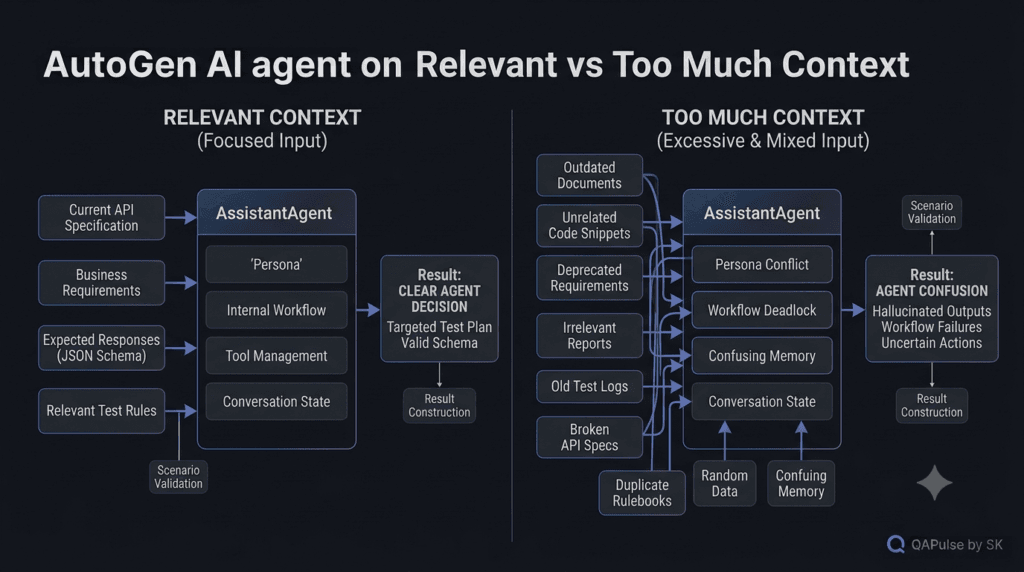
Keep Context Relevant
More context is not automatically better.
Imagine giving the agent:
API specification
+
100 pages of unrelated documentation
+
old test reports
+
deprecated requirements
+
unrelated source code
The agent now has more information.
But not necessarily better information.
A useful strategy is:
Relevant Context
+
Current Context
+
Trusted Context
rather than:
Maximum Possible Context
This distinction becomes increasingly important as AI systems grow.
The First Agent Should Be Observable
If you cannot see what your agent is doing, debugging becomes difficult.
At minimum, during development you should be able to identify:
Agent name
Task
Execution status
Result
Errors
A simple development logger might start with:
print("Agent:", agent.name)
print("Task:", task)

result = await agent.run(task=task)

print("Messages:", len(result.messages))

for message in result.messages:
    print("Source:", message.source)
    print("Content:", message.content)
This is not sophisticated observability.
It is simply visibility.
And visibility is the foundation for debugging.
Don’t Confuse Observability With Logging
Printing output is useful during development.
Production observability goes further.
You may eventually want to capture:
Request ID
Agent name
Task type
Model
Latency
Token usage
Tool calls
Errors
Retries
Result status
This allows you to answer questions such as:
Why did this task take 12 seconds?

Which model handled it?

How many tokens were consumed?

Did the agent call a tool?

Did the model request fail?

Did the system retry?

Which agent produced the final response?
Those questions become critical when AI workloads reach production.
A Useful Development Checklist
Before increasing the complexity of your first agent, verify:
[ ] Model client works
[ ] Agent initializes successfully
[ ] System instructions are clear
[ ] Task is specific
[ ] Result can be inspected
[ ] Errors can be detected
[ ] Model client is closed
[ ] Agent behavior can be evaluated
[ ] Test tasks are repeatable
[ ] Configuration is separated from execution
This checklist is more valuable than simply confirming:
"Hello, world!"
because it tests whether your application has a usable engineering foundation.
Build for Change
Your first implementation should be small, but it should not be disposable.
A good structure might look like:
autogen-agent/
│
├── app/
│   ├── agents.py
│   ├── config.py
│   └── main.py
│
├── tests/
│   └── test_agent.py
│
├── .env
├── .gitignore
└── requirements.txt
The exact structure can vary.
The important idea is separation.
agents.py
    ↓
Agent definitions

config.py
    ↓
Configuration

main.py
    ↓
Execution

tests/
    ↓
Evaluation
As the project grows, this separation becomes increasingly useful.
A Small but Important Rule
Do not put API credentials directly inside your agent definition.
Avoid:
model_client = OpenAIChatCompletionClient(
    model="gpt-4.1-nano",
    api_key="my-secret-key"
)
Instead, use environment-based configuration or an appropriate secret-management mechanism.
For example:
import os

api_key = os.environ["OPENAI_API_KEY"]
Then:
model_client = OpenAIChatCompletionClient(
    model="gpt-4.1-nano",
    api_key=api_key
)
Your secret should never become part of source control.
Also make sure your .gitignore protects local environment files:
.env
.venv/
__pycache__/
This is basic software engineering hygiene, but AI applications frequently involve paid APIs and sensitive credentials, making it especially important.
Your First Agent Is a Baseline, Not the Destination
At this point, you have something much more useful than a chatbot demo.
You have a baseline architecture:
                    ┌──────────────┐
                    │     Task     │
                    └──────┬───────┘
                           ↓
                  ┌─────────────────┐
                  │ AssistantAgent  │
                  │                 │
                  │ Role            │
                  │ Instructions    │
                  │ Context         │
                  └────────┬────────┘
                           ↓
                  ┌─────────────────┐
                  │  Model Client   │
                  └────────┬────────┘
                           ↓
                  ┌─────────────────┐
                  │  Language Model │
                  └────────┬────────┘
                           ↓
                  ┌─────────────────┐
                  │ Structured      │
                  │ Result          │
                  └─────────────────┘
You can now evaluate the agent.
You can change its instructions.
You can change its task.
You can inspect its result.
You can compare different configurations.
You can begin thinking about validation.
And most importantly, you have a clean baseline that can be extended without immediately introducing unnecessary complexity.
Interactive Engineering Challenge
Take your QA agent and give it this task:
A login API accepts an email and password.

HTTP 200 means successful authentication.
HTTP 401 means invalid credentials.
HTTP 423 means the account is locked.

Generate a concise test strategy.
Before looking at the response, write down what you expect the agent to identify.
Your checklist might be:
[ ] Valid login
[ ] Invalid password
[ ] Invalid email
[ ] Locked account
[ ] Missing email
[ ] Missing password
[ ] Empty values
[ ] Malformed email
[ ] Response validation
[ ] Security considerations
Now run the agent.
Compare the response against your checklist.
Do not ask only:
“Was the answer good?”
Ask:
What did it cover?
What did it miss?
What assumptions did it make?
What did it invent?
What should have been validated?
That is a much stronger way to evaluate an AI agent.
The Core Engineering Mindset
The most important shift is this:
Prompt Engineering
        ↓
Agent Engineering
        ↓
AI System Engineering
Prompt engineering asks:
How do I get a better answer?
Agent engineering asks:
How do I give this AI component a useful role and workflow?
AI system engineering asks:
How do I make the entire system reliable, observable, secure, testable, maintainable, and cost-effective?
Your first AutoGen AI agent is the starting point for that journey.
The code may be small.
The engineering principles behind it are not.
From a Working Agent to a Reliable AI Component
A working AutoGen AI agent is only the beginning.
You can create an agent, provide a task, receive a response, and consider the experiment successful.
But software engineering requires a stronger definition of success.
A reliable agent should be:
Understandable
Testable
Observable
Maintainable
Secure
Evaluable
The difference can be summarized as:
Demo Agent
    ↓
Works once

Engineering Agent
    ↓
Works
+
Can be tested
+
Can be observed
+
Can be evaluated
+
Can be maintained
This distinction should influence every AutoGen application you build.
The Right Mental Model for Agent Engineering
Think of an agent as a software component rather than a magical autonomous entity.
A useful mental model is:
┌──────────────────────────────┐
│         Agent Component      │
│                              │
│  Identity                    │
│  Instructions                │
│  Model Client                │
│  Context                     │
│  Execution                   │
│  Optional Tools              │
│  State                       │
└──────────────┬───────────────┘
               │
               ▼
          Model Provider
               │
               ▼
           AI Model
Your Python application controls the surrounding system.
The model generates AI output.
The agent connects the two.
That means you should not expect the model to solve every engineering problem.
Your application remains responsible for things such as:
Validation
Security
Error handling
Configuration
Logging
Evaluation
Resource management
What Makes an Agent Reliable?
Reliability does not come from a single configuration option.
It comes from multiple layers working together.
Reliable Agent
     │
     ├── Clear instructions
     ├── Relevant context
     ├── Appropriate model
     ├── Validation
     ├── Error handling
     ├── Observability
     ├── Evaluation
     └── Security
This is why a 20-line agent can eventually become a serious engineering system.
The initial code may be small.
The surrounding engineering discipline determines whether that code can survive real usage.
Image to include here
Placement: After the reliability model.
Prompt:
Create a premium software engineering infographic showing the layers of a reliable AutoGen AI agent. Place “Reliable AI Agent” in the center and surround it with eight connected engineering pillars: Clear Instructions, Relevant Context, Appropriate Model, Validation, Error Handling, Observability, Evaluation, Security. Use a sophisticated dark developer aesthetic, subtle blue and violet accents, clean vector architecture, professional technical publication quality. Include subtle QAPulse by SK branding. No Day number, no series label, no Part labels, no QR code, no fake URLs, no excessive text. 16:9 landscape.
ALT: Reliable AutoGen AI agent architecture with instructions context validation security and observability
Title: Reliable AutoGen AI Agent Engineering
Caption: Reliable AI agents require more than model access; they need clear instructions, relevant context, validation, observability, evaluation, and security.
The Most Important Comparison: Demo vs Production Thinking
Consider two approaches.
Approach A: Demo Thinking
result = await agent.run(
    task="Generate test cases."
)

print(result.messages[-1].content)
The developer asks:
Did it produce an answer?
Approach B: Engineering Thinking
result = await agent.run(task=task)

response = result.messages[-1].content

validate_response(response)
record_execution(result)
evaluate_quality(response)
The developer asks:
Did it produce the correct, useful, expected, observable result?
That is a major difference.
| Area | Demo Thinking | Engineering Thinking |
|---|---|---|
| Goal | Generate output | Produce reliable output |
| Success | Response exists | Response meets requirements |
| Testing | Manual inspection | Repeatable evaluation |
| Errors | Usually ignored | Classified and handled |
| Context | Whatever is available | Relevant and controlled |
| Security | Added later | Considered early |
| Observability | print() | Structured telemetry |
| Maintenance | One script | Separated components |
Neither approach is wrong for its purpose.
A quick experiment can absolutely use demo thinking.
But production systems need engineering thinking.
Design the Agent Around a Contract
A useful way to improve an agent is to define what it is expected to do.
For example:
Agent Role:
API Test Designer

Input:
API requirement

Output:
Test scenarios

Responsibilities:
- Positive cases
- Negative cases
- Boundary cases
- Validation scenarios

Constraints:
- Do not invent undocumented behavior
- State assumptions
- Identify missing requirements
Now the agent has an informal contract.
You can translate parts of that contract into code.
For example:
def validate_task(task: str) -> None:
    if not task.strip():
        raise ValueError("Task cannot be empty")
And later:
def validate_response(response: str) -> None:
    if not response.strip():
        raise ValueError("Agent returned an empty response")
These checks are simple.
But they demonstrate an important principle:
Agent Instructions
        +
Application Contracts
        +
Validation
are stronger than instructions alone.
Interactive Exercise: Define Your Agent Contract
Before writing another agent, define one yourself.
Choose a role such as:
API Test Designer
Bug Analysis Assistant
Test Data Generator
Requirements Reviewer
Automation Code Reviewer
Then complete this template:
Agent name:
Agent role:

Primary responsibility:

Input:

Expected output:

Must do:

Must not do:

Important assumptions:

Validation criteria:
For example:
Agent name:
api_test_designer

Agent role:
Senior API test designer

Primary responsibility:
Create API test scenarios from requirements

Input:
API specification

Expected output:
Structured test scenarios

Must do:
Cover positive, negative, and boundary cases

Must not do:
Invent undocumented API behavior

Important assumptions:
Explicitly identify missing requirements

Validation criteria:
Every endpoint has positive and negative coverage
This exercise is more valuable than simply experimenting with another prompt.
You are designing a software component.
Why Role Definition Matters in Multi-Agent Systems
A clear role becomes even more important when multiple agents are introduced.
Imagine:
Requirement Analyst
       ↓
Test Designer
       ↓
Automation Engineer
       ↓
Test Reviewer
The Requirement Analyst should not behave like the Automation Engineer.
The Test Reviewer should not blindly regenerate the entire solution.
Each agent should have a reason for existing.
For example:
Requirement Analyst
→ Finds ambiguity

Test Designer
→ Creates scenarios

Automation Engineer
→ Converts scenarios into automation

Test Reviewer
→ Finds gaps
This is better than creating four generic agents and hoping they coordinate intelligently.
When One Agent Is Better
Multi-agent systems are attractive, but more agents also mean more complexity.
If you have:
Simple input
+
Single responsibility
+
Single output
a single agent may be enough.
For example:
agent = AssistantAgent(
    name="test_case_generator",
    model_client=model_client,
    system_message="""
    You generate practical software test cases
    from clear requirements.
    """
)
There is no reason to introduce five agents simply because the framework supports them.
A useful architectural rule is:
Start with the smallest agent architecture that can solve the problem reliably.
Complexity should be earned.
When Multiple Agents Become Useful
Multiple agents can make sense when the workflow naturally contains distinct responsibilities.
For example:
Requirement
     ↓
Analyst
     ↓
Test Designer
     ↓
Reviewer
The benefit is specialization.
The cost is coordination.
Every additional agent introduces another source of:
Latency
Token usage
Failure
Context transfer
Coordination complexity
Debugging complexity
This creates an important trade-off.
Single Agent vs Multi-Agent Architecture
| Factor | Single Agent | Multi-Agent |
|---|---|---|
| Implementation | Simpler | More complex |
| Latency | Usually lower | Usually higher |
| Token usage | Usually lower | Can increase |
| Debugging | Easier | Harder |
| Specialization | Limited | Stronger |
| Coordination | Minimal | Required |
| Failure points | Fewer | More |
| Suitable for | Focused workflows | Complex workflows |
The best choice depends on the problem.
Do not confuse architectural complexity with architectural quality.
Strategy: Add Complexity One Capability at a Time
A strong development strategy is:
Single Agent
    ↓
Reliable Instructions
    ↓
Task Validation
    ↓
Response Evaluation
    ↓
Tool Integration
    ↓
Context Management
    ↓
Memory
    ↓
Multi-Agent Workflow
Each capability should solve a real problem.
Do not add memory because memory is interesting.
Do not add another agent because multi-agent systems look impressive.
Do not add tools because the framework supports tools.
Ask:
What problem does this capability solve?
That question prevents unnecessary complexity.
Build a Repeatable Evaluation Set
One of the best things you can do with your first agent is create a fixed evaluation set.
For a QA agent:
evaluation_tasks = [
    """
    Generate positive API test cases
    for a login endpoint.
    """,

    """
    Generate negative API test cases
    for a login endpoint.
    """,

    """
    Identify boundary conditions
    for a password field.
    """,

    """
    Review a login requirement
    and identify ambiguities.
    """
]
Now every time you change your system prompt or model configuration, run the same tasks.
for task in evaluation_tasks:
    result = await agent.run(task=task)

    print("TASK:")
    print(task)

    print("RESULT:")
    print(result.messages[-1].content)
This gives you a primitive regression suite for agent behavior.
The concept should feel familiar to a QA engineer.
You are effectively creating:
AI Behavioral Regression Tests
Interactive Challenge: Treat the Agent Like a Software Build
Change one thing:
system_message = """
You are a senior QA automation engineer.
Focus on API testing and edge cases.
"""
Run your evaluation set.
Then change it:
system_message = """
You are a senior QA automation engineer.

Focus on:
- API testing
- Negative scenarios
- Boundary conditions
- Response validation

State assumptions when requirements are incomplete.
"""
Run the same evaluation set again.
Now compare:
Coverage
Accuracy
Completeness
Consistency
Usefulness
You are performing an AI-specific form of regression testing.
That is a much stronger learning exercise than simply asking the agent random questions.
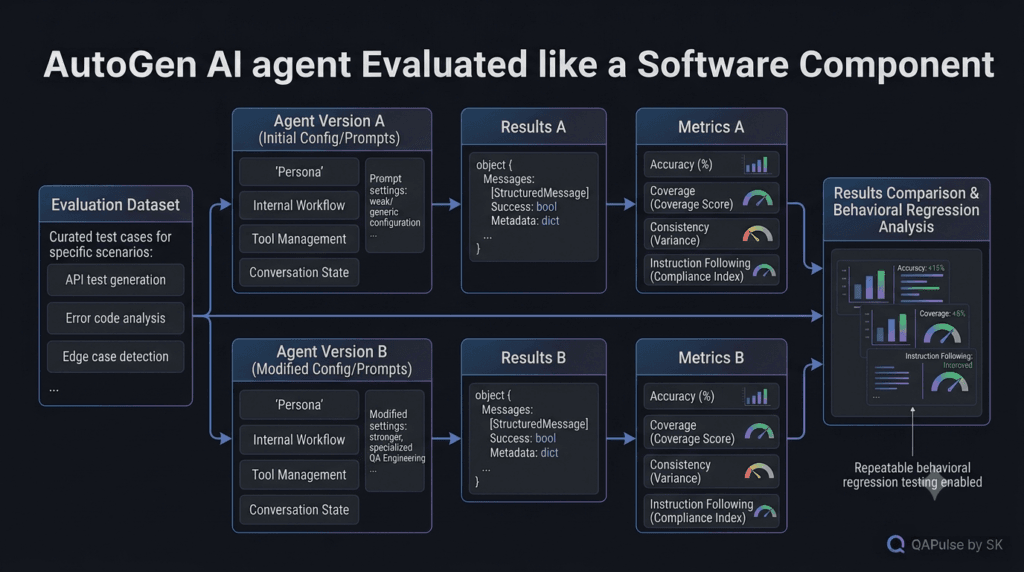
Do Not Evaluate Only the Final Sentence
A common mistake is evaluating an agent only by looking at its final answer.
For example:
print(result.messages[-1].content)
The final answer is important.
But the overall execution may contain useful information.
During development, inspect the complete result:
for message in result.messages:
    print(
        "SOURCE:",
        message.source
    )

    print(
        "CONTENT:",
        message.content
    )
This helps you understand what happened during execution.
As your workflows become more complex, execution traces become increasingly valuable.
You want to know not only:
What was the answer?
but also:
How did the application reach that answer?
Think About Cost Early
Even a simple agent call has an operational cost.
A useful conceptual model is:
AI Cost
=
Input Tokens
+
Output Tokens
+
Number of Model Calls
+
Model Pricing
If you eventually create:
1 task
 ↓
5 agents
 ↓
3 model calls each
you may have substantially more model interactions than a simple single-agent implementation.
This is another reason to establish a simple baseline first.
You need something to compare against.
Think About Latency Too
The same architecture affects response time.
A single call:
User
 ↓
Agent
 ↓
Model
 ↓
Response
has one major model interaction.
A sequential multi-agent workflow might look like:
User
 ↓
Analyst
 ↓
Developer
 ↓
Tester
 ↓
Reviewer
 ↓
Response
Each stage can introduce additional latency.
So architecture affects:
Cost
Latency
Complexity
Reliability
These should eventually become engineering metrics rather than assumptions.
Security Starts With the First Agent
Even your first experiment should establish good security habits.
Never hard-code:
api_key="sk-..."
inside source code.
Use environment variables or an appropriate secret-management mechanism.
For local development:
import os

api_key = os.environ["OPENAI_API_KEY"]
Then configure your model client using that value.
Also ensure:
.env
is excluded from source control when it contains secrets.
The security mindset should be:
Secret
 ↓
Environment / Secret Store
 ↓
Application
 ↓
Model Client
not:
Secret
 ↓
Source Code
 ↓
Git Repository
Don’t Send Sensitive Data to an Agent Automatically
An AI agent can only reason about information you provide to it.
That does not mean you should provide everything.
Before sending application data to a model, consider:
Is this data necessary?
Is it sensitive?
Can it be anonymized?
Does the provider support the required privacy controls?
Should this information be filtered?
This becomes increasingly important for:
Customer data
Authentication information
Production logs
Source code
Internal documentation
Security findings
AI architecture should therefore include data boundaries from the beginning.
A Better Definition of “Autonomous”
An agent is often described as autonomous because it can perform tasks based on instructions.
But autonomy should not mean:
No restrictions
No validation
No supervision
A more useful engineering definition is:
Autonomy
=
Ability to perform defined actions
within defined boundaries
For example:
Agent
↓
Can analyze requirements
↓
Can generate test cases
↓
Cannot deploy production code
That is controlled autonomy.
This distinction becomes essential when agents are eventually given tools that can modify systems.
The Agent Should Have Boundaries
For example:
system_message="""
You are a QA test design assistant.
You may:
- Analyze requirements.
- Generate test scenarios.
- Identify coverage gaps.
You must not:
- Claim that tests were executed when they were not.
- Invent API behavior.
- Modify production systems.
- Present assumptions as facts.
"""
These instructions establish behavioral boundaries.
But again, instructions should not be treated as complete security controls.
If an action is genuinely dangerous, the application should enforce the restriction outside the model.
Model Instruction
+
Application Permission
+
Tool Restriction
is much stronger than:
"Please don't do that."
The Strongest Lesson From Building Your First Agent
The biggest lesson is not the syntax of:
AssistantAgent(...)
The bigger lesson is learning how to think about an AI component.
You should be asking:
What is its responsibility?
What information does it need?
What should it produce?
How do I know the output is correct?
What happens when it fails?
How do I observe it?
How do I evaluate it?
What should it be allowed to do?
What should it never do?
These questions transform an AI demo into an engineering system.
A Complete Minimal Pattern
A clean baseline can look like this:
import asyncio
from autogen_agentchat.agents import AssistantAgent
from autogen_ext.models.openai import OpenAIChatCompletionClient
def create_qa_agent(model_client):
return AssistantAgent(
name="qa_assistant",
model_client=model_client,
system_message="""
You are a senior QA automation engineer.
Focus on:
- Test design
- Edge cases
- Negative scenarios
- Technical accuracy
State assumptions when requirements are incomplete.
Never claim that a test was executed when it was not.
"""
)
async def main():
model_client = OpenAIChatCompletionClient(
model="gpt-4.1-nano"
)
agent = create_qa_agent(model_client)
task = """
Design test scenarios for a login API.
The API accepts:
- email
- password
Success:
HTTP 200
Invalid credentials:
HTTP 401
Locked account:
HTTP 423
"""
try:
result = await agent.run(task=task)
for message in result.messages:
print(message.content)
finally:
await model_client.close()
if __name__ == "__main__":
asyncio.run(main())
This is still a small program.
But it demonstrates a surprisingly important collection of engineering principles:
Clear role
+
Explicit instructions
+
Defined task
+
Model client
+
Asynchronous execution
+
Result inspection
+
Exception-safe cleanup
+
Reusable agent creation
That is a much stronger starting point than an enormous multi-agent application that nobody can explain.
A Practical Architecture Checklist
Before calling your first agent implementation complete, ask:
Agent Design
[ ] Does the agent have a clear responsibility?
[ ] Is its name meaningful?
[ ] Are its instructions focused?
[ ] Are unnecessary responsibilities excluded?
Input
[ ] Is the task specific?
[ ] Does the agent have enough context?
[ ] Is the context relevant?
[ ] Are assumptions identified?
Output
[ ] Is the result inspectable?
[ ] Is the output useful?
[ ] Can it be validated?
[ ] Are important requirements checked?
Engineering
[ ] Is configuration separated?
[ ] Are credentials protected?
[ ] Are errors handled?
[ ] Is execution observable?
[ ] Are resources cleaned up?
Evaluation
[ ] Do you have repeatable test tasks?
[ ] Can you compare versions?
[ ] Can you identify regressions?
[ ] Do you evaluate correctness rather than just execution?
This checklist turns the first agent into a genuine engineering exercise.
Final Strategy: Keep the First Agent Small, Make the Thinking Big
Your first AutoGen AI agent does not need to be impressive.
It needs to be understandable.
A strong progression is:
One Agent
↓
Clear Role
↓
Specific Task
↓
Relevant Context
↓
Inspectable Result
↓
Repeatable Evaluation
↓
Validation
↓
Controlled Expansion
Do not measure progress by how many AutoGen features you can use.
Measure progress by how well you understand the system you are building.
If you can explain why the model client exists, why the agent has a role, how the task is executed, what the result contains, how failures are detected, and how the output is evaluated, you have learned something much more valuable than an API syntax pattern.
You have started thinking like an AI engineer.
Internal Links:
- Learn MCP – Zero to Hero
- Learn AI Agents for QA – Zero to Hero
- Playwright Automation – Zero to Hero
- LangGraph: Complete Zero to Hero
- Learn Python – Zero to Hero
- OpenAI Codex: Complete Zero to Hero
- Cursor AI: Complete Zero to Hero
- Claude Code Tutorial: Complete Zero to Hero
- AutoGen: Complete Zero to Hero Guide
- Free QA Resources Built From Real Experience
- QA Glossary: Test Automation Terms Every Engineer Should Know
External Links:
- Official AutoGen Repository: Microsoft AutoGen GitHub Repository
- Official AutoGen Documentation: AutoGen Official Documentation
- AutoGen Agents Documentation: AutoGen Agents Documentation
- AutoGen Agent and Multi-Agent Concepts: AutoGen Agent and Multi-Agent Applications
- AutoGen Messages: AutoGen Message Documentation
People Asked Questions
What is an AutoGen AI agent?
An AutoGen AI agent is a software component that uses a language model to perform a defined task based on instructions, context, and application-controlled execution.
What is AssistantAgent in AutoGen?
AssistantAgent is an AutoGen agent implementation designed to interact with a model client and execute tasks using the AgentChat framework.
How do I create an AutoGen AI agent?
A basic AutoGen agent can be created by configuring a model client, creating an AssistantAgent, providing system instructions, and executing a task with the agent.
Is AutoGen good for building AI agents?
AutoGen is useful for building AI-agent and multi-agent workflows, particularly when applications need agent roles, conversations, tool usage, orchestration, and structured workflows.
What is the difference between an AI agent and an LLM?
An LLM primarily generates responses from prompts and context. An AI agent adds application-level behavior around the model, such as task execution, tools, state, validation, and workflow control.
Should I use one agent or multiple agents?
Start with one agent when the task has a focused responsibility. Multiple agents are useful when distinct responsibilities genuinely benefit from specialization.
How do I test an AutoGen AI agent?
Create repeatable evaluation tasks and compare the agent’s outputs for accuracy, completeness, consistency, instruction following, and other application-specific requirements.
How can I make an AutoGen agent reliable?
Use clear instructions, relevant context, validation, error handling, observability, repeatable evaluation, security controls, and explicit capability boundaries.
AI Overview Optimization
An AutoGen AI agent is an application component that combines a language model with instructions, context, task execution, and application-level controls. A reliable agent should also include validation, error handling, observability, evaluation, and security boundaries.
AI Overview Entity Relationship
AutoGen
↓
AgentChat
↓
AssistantAgent
↓
Model Client
↓
Language Model
↓
Task
↓
ResultExtended engineering model:
AutoGen AI Agent
↓
Role
↓
Instructions
↓
Context
↓
Task
↓
Model
↓
Result
↓
Validation
↓
EvaluationAnswer-Engine-Friendly Definition
An AutoGen AI agent is a software component that uses a language model to perform a defined task within an application-controlled workflow.
Conclusion
Building an AutoGen AI agent is technically straightforward, but building one responsibly requires a much broader mindset.
The basic implementation connects a model client to an AssistantAgent, gives the agent a defined role, sends it a task, and processes the resulting messages.
That is the foundation.
The engineering work begins when you ask what happens around that foundation.
A useful agent needs clear responsibilities.
It needs relevant context.
It needs explicit tasks.
Its results need to be inspectable.
Its behavior needs to be evaluated.
Its failures need to be handled.
Its credentials need to be protected.
Its capabilities need boundaries.
And its complexity should grow only when the problem requires it.
The most important principle is simple:
Start with one understandable agent, establish a reliable baseline, and add complexity only when it solves a real engineering problem.
That approach gives you something far more valuable than a working demo.
It gives you an architecture you can reason about.
Final Key Takeaways
- An AutoGen AI agent is an application-level component built around a language model.
AssistantAgentprovides a practical starting point for building model-powered agents with AgentChat.- The model and the agent are not the same thing.
- The model client provides the communication layer between the agent and the model provider.
- A system message establishes the agent’s intended role and behavior.
- Instructions influence behavior but do not guarantee correctness.
- A specific task generally produces a more useful engineering experiment than an ambiguous prompt.
run()executes the agent task and produces structured execution results.- Async execution is important because model interactions involve external operations.
- Configuration should be separated from execution whenever possible.
- A single specialized agent is often better than an unnecessarily complex multi-agent system.
- Multiple agents make sense when distinct responsibilities genuinely benefit from specialization.
- More agents can also mean more latency, cost, coordination, and failure points.
- Relevant context is usually more valuable than simply providing more context.
- AI output should be evaluated for correctness, not merely checked for successful execution.
- Repeatable evaluation tasks can become the foundation of AI behavioral regression testing.
- API credentials should never be hard-coded into source code.
- Agent capabilities should have clear boundaries.
- Application-level validation is stronger than relying only on natural-language instructions.
- A small, observable, testable baseline is the best foundation for expanding an AI system.
The goal is not to build the most complicated agent.
The goal is to build an agent you can understand, test, trust, and improve.
Continue Learning
Explore more expert articles on n8n, Autogen, Postman AI, LangChain, CrewAI, MCP Servers, AI Agents, LlamaIndex, Docker, FastAPI, Playwright, Cypress, Test Automation, DevOps, and Software Engineering at www.skakarh.com.
QAPulse by SK delivers expert release analysis, AI engineering insights, enterprise automation strategies, migration guidance, DevOps best practices, and practical testing knowledge to help software professionals build scalable, intelligent, and production-ready software systems.